
I hope you've enjoyed all the posts from the Button Down Rehab series as much as I have, but unfortunately, today's project is the last one in the series.
But don't be sad, let's make a pillow instead (and maybe next Monday's giveaway will also help a little :)!

The last Button Down Rehab project comes to you courtesy of an Express shirt I've had since high school.
I've worn the crap out of this shirt since I first bought it. I remember thinking how cool and cute I looked in it when I bought it. Seriously? Calm down 16-year-old me. Thankfully my sense of style has evolved since then.
In recent years said shirt has become a little too...um...snug...thanks to a couple children who will remain nameless *cough cough*. Here's the original shirt (and my toes):

Pretty blah right?
My husband actually gave me the idea to make a pillow out of it. He has been nagging...I mean gently reminding... me to make him a pillow for our computer chair, which is actually one of our breakfast table chairs. We moved the computer from the upstairs to the kitchen so it'd be easier to use the computer and keep an eye on the kids at the same time. As much as I love hearing "I'm the Map, I'm the Map" 30 times in 1 episode, I need something to distract me.
My husband actually gave me the idea to make a pillow out of it. He has been nagging...I mean gently reminding... me to make him a pillow for our computer chair, which is actually one of our breakfast table chairs. We moved the computer from the upstairs to the kitchen so it'd be easier to use the computer and keep an eye on the kids at the same time. As much as I love hearing "I'm the Map, I'm the Map" 30 times in 1 episode, I need something to distract me.
The old computer chair became my new comfy craft chair upstairs, which left us to use one of the kitchen chairs - which is not so comfy. So I took my old button down and transformed it into the Tuxedo Pillow - so named because of the bow shape and the ruffles, which reminds me of an old school tuxedo...in case you were wondering.
Supplies:
- Button down shirt
- Pillow stuffing
- Seam ripper
- Rotary cutter and cutting mat
- Sewing machine and thread
- Iron and ironing board
- Zipper foot
Step 1: Cut your pillow shape.
Make sure your shirt is buttoned. Using your cutting board and mat, trim your shirt to the size you want, leaving some extra for seam allowance. Mine was about 25 inches long and 24 inches wide. You'll notice my shirt has a curve to it on both sides, which is what gives the shirt it's bow shape. Mine was already like this due to a few darts in the side, but if your shirt isn't already curvy, you can cut a slight curve in the sides a bit. Don't go overboard on the curvy-ness though or you'll end up with a very funky looking pillow.

You want the top and bottom to be straight. Since the bottom of my shirt had a curve to it, I trimmed it straight across with my rotary cutter

Only the top and bottom are open on my piece since I didn't need to trim the sides. If your sides are open, place your fabric pieces right side together, pin, and sew down both sides then turn right side out.
You should now have a nice little curvy rectangle that will be your pillow form.
Step 2: Cut out the fabric for your ruffles.
Now you want to cut enough fabric for your 2 ruffles. The length of your ruffle is up to you. I made my ruffles almost as long as my pillow because that's all I had to work with but the longer, the better. Measure the length from the top to the bottom of your pillow form and double it to get a decent ruffle that spans the entire length of your pillow. The width should be about 2 1/2 inches per ruffle. You will need 2 pieces in this length and width.
Since my shirt is a short sleeve shirt, the longest piece of fabric that would work for me came from the back of my shirt right below the collar. If you have a long sleeve shirt, you could use one of your sleeves.

I cut out my rectangle and then trimmed it to make sure it was straight on all sides. Then, I cut my rectangle in half to create my two 2 1/2 inch rectangles (1 for each ruffle).


Here are my 2 (pre-ruffled) pieces of fabric!
Now take your iron and, with your pieces right side down, iron 1/4 inch on each side of your ruffle pieces. Using a straight stitch, sew both short sides and one long side on each ruffle.

Step 3: Gather and attach your ruffles.
To make your actual ruffle, set your sewing machine length and width to the highest numbers. Without backstitching, sew across the 1 long side you left unsewn on each of your ruffle pieces, leaving long tails at each end when you cut your thread. Now, tie a knot on one end with your 2 string tails. On the other end, gently tug one string and push the fabric toward the other end, making it ruffle up like a curtain on a rod. When you've reached your desired ruffle length, tie a knot in your threads and cut the excess.


Now to attach your ruffles, you'll need to use your seam ripper to rip the seams on the button closure that is on the front piece of your pillow form.
First, find the side with the button holes. Using your seam ripper, rip the stitches down the side of your button closure to open it up.


See how my seam is now open from the side to the button holes? Tuck one of your ruffle pieces into that side seam and pin all the way down. Now sewing on top of where the original stitches were, sew all the way from the top of your pillow to the bottom to attach your ruffle.
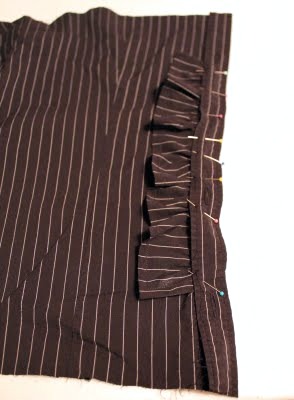

The other side is easy because there aren't any stitches to pull. Just tuck your other ruffle underneath the flap as close to the buttons as you can get. Using your zipper foot, stitch from the top of the shirt to the bottom to attach your second ruffle.

The zipper foot is essential because you have to sew very close to the buttons on your shirt.

You should now have both ruffles attached, and your pillow should look like the picture below.

Step 4: Stitch closed and stuff your pillow.
Turn your pillow form inside out so that the right sides are together. Pin the raw edges together on the top and bottom, leaving a 4 inch opening on the bottom for turning.
Stitch straight across your top and bottom to close, stopping where you left your opening to turn. Turn your pillow inside out. Use a chopstick or knitting needle to push out your corners.


Now, stuff your pillow to the desired volume, and hand stitch the opening closed.


Now decorate with your new pillow!


See, there are some good things that come out of high school ;)
_____________________________________
Thank you so much for joining me for the Button Down Rehab series!! Special thanks to Krista, Shannon, Gwen, and Rebecca who guest posted and shared their awesome projects.
I hope you've had just as much fun as I have refashioning and upcycling your old button down shirts. To say thank you to all of my blog friends, new and old, I hope you'll come back Monday and enter my giveaway to win some great stuff!
Check out all of the projects in the BDR series:
 |  |  |
 |  |  |
 |  |  |
 |
______________________________________
Linking up!
 |  |  |  | ||
 |  |  |  |  | |
 |  |  |  | ||
 |  |  |  |  | |
 |  |  |  |  | |
 |  |  |  |  |
 | Show and Tell Wednesday at Blue Cricket Design |
Love this! Very cute idea! The ruffles are a great little addition to add some fun!
ReplyDeleteHave a great holiday : )
Great series wrap up, Jen. This is a very cool pillow. Love it!
ReplyDeleteI love it! I'm pinning this for later!
ReplyDeleteGreat pillow! The series was fun. :)
ReplyDeleteThat is so cute!!! I love it!!
ReplyDeleteLoved the whole series! What's next? How about a "cupcake" series or a "felting" series or one on recycling old pillowcases (I saw a cute kid's paint smock made from one)? Love, Fake Mom
ReplyDeleteWhat an awesome series! And I must say I LOVE that pillow!
ReplyDeleteIt would be great to have you come link up to my party-- http://catonalimb.blogspot.com/2011/06/out-on-limb-no-7.html
I just pin your pillow... I'd love for you to share it at my link party.
ReplyDeleteThank you so much for the tutorial!
Such a cute pillow!! TFS!! Stopping by from Think Pink Sundays and your newest follower on your blog and FB.
ReplyDeleteHere is what I shared this week: http://craftybrooklynarmywife.blogspot.com/2011/06/summer-pillows.html
Happy 4th of July!!
your pillow is FABULOUS!! I would LOVE for you to share this at our link party going on NOW.
ReplyDeleteAmy
www.SistersoftheWildWest.blogspot.com
Too fabulous! Great job!
ReplyDeleteSo cool! I love how it turned out!! Thanks for sharing. Your blog is fabulous:) Have a great 4th!
ReplyDeletewww.karismaheartsavannah.blogspot.com
So precious! thanks for your comment on my post and happy to see all your ideas. Going to pin some on my pinterest "to do" boards.... excellent blog!
ReplyDeleteHow adorable is this pillow!!! Great tutorial too :D I think I've got just the shirt for this hanging in my closet!
ReplyDeletewow i love this! I found you on sugarbee! I have tons of shirts my hubby doesnt wear anymore. Love this tutorial and i can't wait to try it out
ReplyDeleteWhat a great idea! I'm moderately obsessed with pinstripes, so this pillow design is right up my alley. Great series!
ReplyDeleteWarmly,
Stephanie Hillberry
this is so cute! :) i love it! im thinking about what items in my closet i have to do this to... :)
ReplyDeletethe style projects
this pillow has so much personality! thanks for sharing such a fun idea :)
ReplyDeletekaricorsi.blogspot.com
I just found this project through Craft-o-maniac! I love it and I'm your new follower.
ReplyDeleteI'd love if you would join us over at Sew Woodsy and link up this awesome pillow. I'm ready to run to the thrift store and buy a button down just to make one of my own! :)
Very cute pillow! Love the design. And a great way to use a shirt you never wear anymore!
ReplyDeleteLove this idea!!! Well done!!
ReplyDeleteThank you for sharing your pillow at the link party... I love it!
ReplyDeleteHoly cow thats a cute pillow! Im adding it to my favorite tutorials board on pinterest.
ReplyDeletehttp://pinterest.com/mccoyalicious/fab-tutorials/
And Im making one the second my machine gets back from the shop!!
wow this is SO cute!!! thanks for sharing. I LOVE IT
ReplyDeletejaysonandashley.blogspot.com
love this...i have this shirt too!! well, one like it that i've had for like 8 years. but now i have something to do with it! :) thanks!
ReplyDeleteI love it, its very enticing and so cute tuxedo pillows. I'm gonna also make one and I'm gonna call it tuxellows.lol
ReplyDeleteFound this from a pin on Pinterest. Such a cute pillow! Would it be possible to have the buttons be working, and remove the pillow form from there, for washing etc...?
ReplyDelete