Well this past summer I've learned a very important lesson: I don't enjoy caring for flowers.
They're pretty, don't get me wrong, but I learned very quickly how many weeds a garden can produce in a very short time. Weeding is a full time job, and I couldn't handle keeping a house, a toddler, and a weed-infested garden at the same time. I think my other problem with flower gardens is that they don't seem to give back like fruit and veggie gardens do. I would much rather pick a ripe
cantaloupe from my garden and happily eat it feeling like all my hard work paid off. With flowers, you pick them and put them in a vase, just to have them die a short while later. What I'm trying to say is basically that I'm a lazy weeder. And I'd rather eat
cantaloupe.
My flower garden
did do well for awhile...that is until the crazy Tennessee rain storms kicked in and made the weeds sprout more than the flowers. I had good intentions, I tried to weed when I could, but I just couldn't seem to keep up. Eventually, one side of my poor garden was so overgrown with weeds that Pat just put it out of its misery and mowed over it one night as he was cutting the lawn. The remaining flower garden lives on in weed-infested misery though, doing what it can to survive despite my neglect. My fruit and vegetable garden on the other hand? Well, that's another matter.
Pat planted a small garden in the backyard for me in early spring so I could try my hand at killing growing some fruits and veggies. I planted 2 cantaloupe plants, 2 tomato plants, 2 strawberry plants and a handful of red onions. Fast forward 3 1/2 months and I can proudly say that most of my garden is doing great. The strawberry plants were planted a little late in the season and never produced anything and unfortunately the red onions didn't do well in the soil, but the tomato plants have sprouted about 20 tomatoes and the cantaloupe plants? Well, they've pretty much taken over the entire plot.  This is actually a picture from over a month ago. We had some heavy rains recently and ever since then, the cantaloupe plants seem to have a mind of their own. So far, we've managed to get 2 ripe fruit from them but as soon as those two were picked, I've found about 12-15 new cantaloupe growing.   |  |
I haven't had to weed the fruit and veggie garden as much (big plus!) and it's already made up for itself by giving us some delicious produce.
Remember the valance turned into hanging pockets that I made for Haley before she was born? Well, it recently got a new life. Or should I say, a nother new life. Haley has gotten into a habit of waking up at an unreasonable hour, i.e. any time before 7:00am. We'll be sleeping peacefully and all of the sudden hear little squeals of annoyance coming from her room as she whines to be let out of her crib at 6am. Little does she know that as you get older there's this thing called "school" that she'll have to go to which will make her get up even earlier and actually miss the days she was allowed to sleep in until 7am. I tried to sit down with her and explain that it would be great if she would let Mommy and Daddy sleep until 7 on work days. She just stared at me then toddled off to watch Fresh Beat Band. There's no reasoning with 17-month-olds. Anyway, I needed something to distract her so we could get in just a few more minutes of sleep, and I thought about the hanging pockets I had made. I originally made the valance into hanging pockets and hung them with curtain rods from the wall because the room Haley was in as a newborn didn't have much storage space and I needed something to keep odds and ends in for easy access. Since we moved, her room is now much bigger and the hanging pockets have been sitting unused in her closet for the past year. The pockets seemed like the perfect solution to keep Haley entertained for awhile. By snipping some of the pockets to make larger pockets and adding straps and Velcro, the valance became a hanging crib bag!   Haley loves having some of her favorite toys at arm's reach each morning and evening. She reads her board books and plays with her stuffed animals, and Mommy and Daddy get some much-needed rest! That, my friends, is what we call priceless. The only problem I've found though is that while I thought Velcro would be strong enough to hold everything, I didn't take into account the little toddler who likes to take everything apart. Haley quickly figured out that she could tear the crib bag off of her crib, so part of my morning and night routine has been to reattach the bag. I'll be giving the valance yet another makeover soon by adding some snaps in place of the velcro.
Who is that hiding among the bananas? It's a felt pear keychain! He's doing a pretty terrible job at camoflauge, but isn't he cute?  While he may not be a master of disguise, but this little felt pear is perfect for keeping your house key company or maybe adding to your already massive keychain collection. While he may not be a master of disguise, but this little felt pear is perfect for keeping your house key company or maybe adding to your already massive keychain collection.

This little guy was inspired by my friend Lindsey who writes about her "saucepan-passions" on her site A Pear to Remember. Lindsey reminds us that you don't have to be on the Food Network to make delicious, fresh food...you just have to love good food. And who can't appreciate that? I shipped him off to Lindsey late last week where he now lives in less humid climates (lucky). After making the little felt pear, I decided the poor guy looked pretty lonely, so I broke out more felt and made a watermelon slice, complete with french knot seeds. 
Even with a bite taken out of his head, this little guy is still smiling. Maybe because he found a friend? 
After making these two, I got excited and drew up a whole line of fruit and veggie felt friends that may have a future as a line of refrigerator magnets for Haley since she insists on taking all my other magnets down and carrying them around the house. Also because I want a reason to make more of these guys but I don't know what I'd do with 15 keychains. Maybe I'll start a collection?
I love the weekends, especially when they involve eating your way through a city. A few friends and I got together yesterday with one single goal: to seek and destroy some delicious Memphis food. Since we didn't want crying children to ruin our food adventure, we got a babysitter and set out on a culinary journey to Gus's Famous Fried Chicken (of Food Network and Man vs. Food fame) and Kooky Canucks (of Man vs. Food fame.) If you've ever seen either of these two restaurants on TV, you know that their food just looks way too good NOT to try. For some reason, the Memphis episode of Man vs. Food always seems to come on TV when I'm working out. It's extremely difficult to focus on running when Adam Richman is chowing down on some of the most delicious looking fried chicken I have ever seen. Being pregnant is also a great excuse to go downtown for some grub. Or go anywhere for some grub for that matter. Our first stop was Gus's Fried Chicken. We had  been warned that Gus's was kind of a hole in the wall, but hey, some of the best restaurants are. When we got there, we could see why. Upon first glance, Gus's wasn't anything special. A small, inconspicuous-looking restaurant a short walk from Beale St. with a single sign out front simply stating "Gus's Friend Chicken, World Famous." Pretty lofty claim for such a small place, but one step inside the barred door proved that many people agreed with their claims. As we walked in, the smell of fresh chicken and fries was everywhere. The walls were simply decorated with eclectic pictures of dancing chickens and the daily beer offerings, and the room was packed with a number of small tables filled with hungry people. We were seated at a table in the corner after a short wait and introduced to our waitress who (luckily for her) was able to handle plenty of sarcasm. We each ordered heaping of plates of fried chicken accompanied by baked beans, coleslaw, and slices of white bread - and for the true southerners with us, sweet tea - and discovered after the first bite that the chicken at Gus's was worth all the hype. 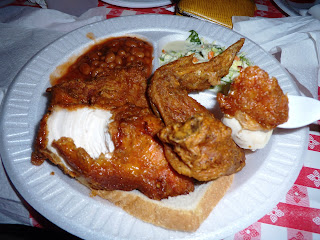
Each bite had just the right amount of spice and crunch. Unlike other places where I've had fried chicken, the breast meat was juicy and plentiful and fat-free - meaning well-trimmed. Only in my dreams would this chicken have been a fat-free food. A girl can dream, right?  |  |
After stuffing ourselves with chicken, it was off to our next stop - Kooky Canuck for their delicious skillet-cooked cookies because really, what is lunch without closure? And what better closure to an amazing day than a giant, ice cream topped cookie?

I first learned about Kooky Canuck (formerly Big Foot Lodge) on Man vs. Food when Adam Richman went to Memphis to tackle their Big Foot Burger - a 7 pound mammoth hamburger the size of a small child. But other than making huge hamburgers that can feed a small army, they also have delicious desserts, like the skillet chocolate chip cookie that I shared with the hubby. The cookie is not just any cookie - it's served in a skillet, piping hot from the oven and topped with delicious vanilla ice cream. If I hadn't just eaten a giant plate of chicken, I'm sure I could have eaten this cookie all by myself. I couldn't even get a picture before tearing into this thing. They even offer peanut butter cookies topped with ice cream if you prefer. I'll definitely be going back for that one.
So that's how my Saturday was. I hope yours was just as delicious.
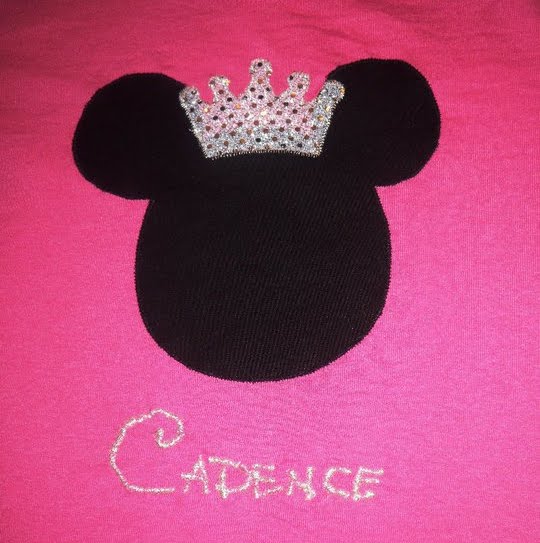
A month or so ago, a friend of mine asked me to make Disney shirts for her kids (a boy and a girl) so they could wear them on an upcoming trip to Disney World. I wanted the shirts to look classic and not goofy (no pun intended) so I chose to use the iconic Mickey Mouse head and ears as the main focus and tailor them to each child. I found a silhouette of Mickey's head by googling "Mickey Mouse Head" (brilliant, right?) and a bunch of different images popped up. I also found styles of crowns for a boy and a girl for on top of Mickey and Minnie's heads. Next, I traced the images onto fabric, attached some fusible webing to the back, and ironed the silhouettes of the heads and crowns onto the shirts. I then used a zig-zag stitch all the way around to secure the applique. To finish, I set my sewing machine's stitch length and width to a low setting and attempted to embroider the kids' names to their shirts in a "Disney-style" lettering. Let me tell you, this was not an easy task since I don't have an embroidery foot plus I have no experience embroidering so the names didn't turn out exactly how I wanted them (perfectionist side coming out.) Looking back I would have used freezer paper stenciling to stencil the names onto the shirts, however I hadn't heard about this method at the time so I did what I knew. Or in reality didn't know :P Live and learn right? Anyways, here they are!  |  |

After I making a full-length apron for myself months ago, I bought fabric to make aprons for my mother-in-law and sisters-in-law for their birthdays. I made half aprons this time because I felt like the full-length version was just too much fabric when 1/2 would do just fine. Hopefully my sisters-in-law think so too :)  |  |
Baby bump alert! You can kind of see my baby bump in the second picture, and believe me when I tell you the picture makes me look small. I'm amazed at how much more I'm showing this time around. Many people told me that I would show quicker with the second baby, boy were they right. I'm 21 weeks this Friday, and I feel like I'm showing as much as I did at 25 weeks....I really hope this doesn't mean Connor is going to be a giant baby. Maybe I should cut back on the onion rings (which have become my latest, and most persistent, pregnancy craving.)
Speaking of babies, look who got jealous while I was trying to take pictures?
 What can I say, I'm a sucker for that little face, I can't deny her anything. Lately, Haley has grown more and more attached to one Baby Einstein movie in particular called "Baby's First Sounds." The main character in it in a little bee hand puppet that makes appearances throughout the video and makes little buzzing and squeaking noises. Every time she sees that bee, she gets a giant smile on her face and squeals "BEEEE!!" She asks for that movie all the time. We'll be driving along in the car and we'll hear a little voice say, "Bee?" from the backseat. What can I say, I'm a sucker for that little face, I can't deny her anything. Lately, Haley has grown more and more attached to one Baby Einstein movie in particular called "Baby's First Sounds." The main character in it in a little bee hand puppet that makes appearances throughout the video and makes little buzzing and squeaking noises. Every time she sees that bee, she gets a giant smile on her face and squeals "BEEEE!!" She asks for that movie all the time. We'll be driving along in the car and we'll hear a little voice say, "Bee?" from the backseat.
It really is adorable, even if I have watched "Baby's First Sounds" at least 20 times over the past 4 days. Seriously, I have it memorized down to the music that goes along with each scene. As Pat reminded me a couple days ago though, someday Haley is going to be 16 years old and we're going to pull out "Baby's First Sounds" and sob over how much she used to love The Bee. I just hope Baby Einstein comes out with another movie featuring The Bee before I start playing the movie over and over in my sleep. 
| | | | | 


 First, you want to measure the width and height of your container. When measuring height, make sure you measure the approximate height of your container's label and not the whole container itself. You'll notice in the pictures that the cans have metal bands around the tops and bottom, you want to make sure you don't add these area's into your calculations or you'll end up overlapping the bands with scrapbook paper. The Lil' Crunchies container I used was about 12 3/4 inches wide and 4 inches tall.
  Second, cut out your scrapbook paper and attach around the perimeter of your container by gradually coating the can in a thin coat of Mod Podge one section at a time. Make sure you take your time with this, you don't want to smear extra glue on the outside of your scrapbook paper (speaking from experience here :) If your scrapbook paper wrinkles as you're attaching it, carefully peel back that section and smooth it down again with your fingers. Don't use too much Mod Podge. This will lead to more wrinkles and soggy paper. Some wrinkles will happen, you just want to avoid as many as you can :)
 Third, use extra scraps to decorate your containers wherever you want and attach with Mod Podge. I put a border at the top of one of my containers. You could also cut out some flowers or use stickers or other scrapbook decorations to jazz up the containers. The sky's the limit! You could get really creative with these depending on your interpretation. I didn't have the
  Fourth, cut out some circles (or whatever shape you prefer) out of scrap paper to use as labels for your containers. I used a coffee cup to trace a circle, but you could use whatever happens to be laying around. You could also make your own label by using Photoshop or Word and pasting it on. Next, take a Sharpie marker to write the contents on your labels. I have boy handwriting so if you're like me, you can find a fun font on Word to use as guidance. Mine still came out a little funky, but hey, that's the charm of handmade stuff right? Attach your labels to the cans using more Mod Podge.