I have a thing for appliqued shirts (if that wasn't abundantly obvious.) Probably because of the instant gratification they give me. I get a cute shirt in half the time without having to make the actual shirt itself, and that leaves me more time for really important things, think like eating bowls of Oh's cereal while catching up on my DVR'd episodes of Chopped (there's just something so intriguing about watching four people frantically attempt to make an appetizer out of stuff like candy canes, lamb chops, and pancake mix.)
I get inspiration from so many different things that I have to keep a running list in my phone. For this project, my inspiration was a mitten. Originally, I had a vision of making a cute ruffled dress for my daughter with striped mitten pockets. The dress became a shirt, then the stripes became hearts but hey, at least my mitten pockets remained unchanged.
Wanna make one too?
Supplies:
- Shirt
- Scraps of knit fabric
- Ric-rac
- 2 buttons
- Sewing machine and basic sewing supplies
- Free mitten template for download HERE
Step 1: Make your mittens.
First, print and cut out my mitten template. Using a disappearing ink marker, trace the template onto your knit fabric. Flip your template and trace a second mitten. Cut out.
Next, fold the bottom of your mitten up 1/4 inch and press. Fold up another 1/4 inch and press. Using a zig-zag stitch and coordinating thread, stitch straight across.
Step 2: Attach your mittens.
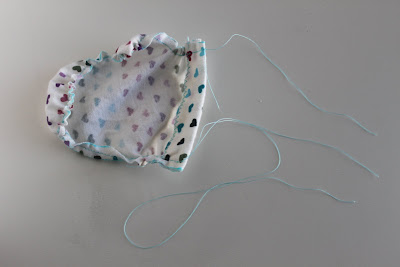
Now you need to enclose the raw edges of your mittens. We'll do this with a gathering stitch. Set your stitch width and length to their highest settings and stitch 1/4 inch around the perimeter of your mitten, making sure not to backstitch at the beginning or end. Leave the tails long for gathering.
Tie the tails at one end of your mitten in a knot. At the other end, pull gently on one of your threads and push the fabric away from the thread to form gathers. You'll have to work to distribute the gathers evenly around the mittens, especially around the thumbs. You want to gather just enough to keep the raw edges of your mittens underneath so that they're not exposed when you sew your pockets on.
Place your mitten pockets on the top of your shirt and make sure they're lined up exactly where you want them. Now pin pin pin.
Make sure you're happy with the placement because there's no going back once you stitch everything in place!
Once you have your mittens pinned where you want them, use your coordinating thread to stitch your mitten pocket in place using a 1/4 inch seam allowance (don't sew the top closed :) Add some ric-rac for the string (stitch down with coordinating thread) and a couple buttons for decoration.
Here's a close-up of the pocket detail.
The pockets are a great place for kids to hide their treasures.
The pockets are also really great for blogging mommies to hide the bribes for photo sessions (smile if you want chocolate!)
Check out my sidebar to see where I link up each week!


This shirt is simply gorgeous.
ReplyDeleteLoving the pictures, too.
Greetings from Germany
Catrin
This is adorable! What a great pocket idea! Thanks do much for linking up today. :)
ReplyDeleteAdorable!! I must find a shirt to try this with. Pinning it! :o)
ReplyDeleteSo cute! :)
ReplyDeleteThis is adorable! So cute! I pinned it for later
ReplyDeleteSOOOOOOO Cute!! Love it!! Found you on Sumo's Sweet Stuff, hope you have a great week!
ReplyDeleteMichelle
www.delicateconstruction.com
Great idea- my daughter is VERY into pockets so I think this project is in my future!
ReplyDeleteSo cute! What a brilliant idea!
ReplyDeleteLove this - my kids would think these were so neat - my 2-year-old just discovered the amazing usefulness of pockets! I found you from Sew Much Ado
ReplyDeleteadorable!
ReplyDeleteAbsolutely adorable! I found you at Creative Juice Thursday and am a new follower. I have a new meme called Thematic Thursday and this week's theme is Winter/Snow. I'd love to see this post link up. Find Thematic Thursday here.
ReplyDeleteOMgosh...i love this..xo
ReplyDeleteLove it!! Thanks for sharing @'Sew Cute Tuesday! I'll be featuring you on 1/17, so be sure to stop by and grab a 'featured' button!
ReplyDeleteThese are adorable!! I would love it if you would share them at our sharing party at http://craftymomsshare.blogspot.com/2012/01/sharing-saturday-2.html. Thank you!
ReplyDeleteOh how freakin' adorable is that?!? I love it, and I bet your little lady loves it too! I'd be thrilled if you'd come share this {and any other projects you'd like to show off ;)} at the Head to Head Showdown, going on right now at www.icantstopcrafting.blogspot.com ~Jen
ReplyDeleteHi Jen, this little girl shirt is so adorable. How clever. I bet your daughter was thrilled to bits with it. Thanks so much for sharing. I have recently found your blog and am now following you, and will visit often. Please stop by my blog and perhaps you would like to follow me also. Have a wonderful day. Hugs, Chris
ReplyDeletehttp://chelencarter-retiredandlovingit.blogspot.com/
Hi! Visiting from sundae scoop. This is super adorable! I wish I was a sewer so that I could make one for my daughter. Great job :)
ReplyDeleteI would love for you to share this at my link party in you get a chance :)
This looks so fun! I have to make it!!! Very nice idea!
ReplyDeleteThis is adorable! You're daughter is such a cute little model!!
ReplyDeleteI'm hosting a winter theme linky party and would love it if you'd link up!
www.serendipityandspice.blogspot.com
-Melissa
ohhhh my goodness how darn cute!!!! and it seems like something I could handle too! Love that!
ReplyDeleteJaime from crafty scrappy happy