Showing posts with label Birthday. Show all posts

Monday, July 30, 2012

Spongebob Squarepants dress


A friend of mine (the one I made the Hospital Survival Kit for last year) recently asked me to make a dress for her daughter for her first birthday. She loves Spongebob Squarepants, so of course the party had to be Spongebob-themed and you can't have a Spongebob party without the proper attire. She wanted a girly version of Spongebob's outfit, so I immediately thought of Ashley's tutorial on how to turn a onesie into a bubble dress on Make It and Love It. I liked the idea of using a onesie rather than a regular t-shirt because they're longer and also because I could still incorporate the general idea of Spongebob's outfit but make it girly by adding a gathered bottom and sparkly tie.


I used fabric paint with glitter in it for the tie (not sure if you can see the glitter well in the picture above, but it's there!) and used freezer paper to paint it on the shirt in the shape of a tie.


I also made a simple bow hair clip with some red ribbon that I had.


How cute is she??

Check out my sidebar to see where I link up each week!

Wednesday, March 14, 2012

Balloon wreath


Of all the things I made for my daughter's Up!-themed birthday party, the balloon wreath is the very first thing I did. Since a major part of the movie Up! is centered around balloons, I knew I had to make a balloon wreath for the front door to set the theme. I got the inspiration for the wreath from this one on How Does She? I put my own spin on it, and this is what I came up with!

Supplies:
  • Styrofoam wreath form
  • Crepe paper
  • Balloons
  • Greening pins (u-shaped pins found in the flower arranging section)
  • Embroidery floss
  • Hot glue

First, wrap your wreath form in crepe paper, gluing at the ends with hot glue. If you want to use something sturdier, wrap your wreath form in fabric. I went the easy route, but crepe paper is fragile so you have to watch out for tears as you wrap.


Next, take your greening pins and a balloon and stick them to your wreath form. You want to push the greening pin in around the middle of the balloon to secure. Make sure your balloons are close together so they hide the greening pins.


Repeat this process to make a cluster of balloons. To finish, wrap some embroidery floss around the wreath and glue at the ends.


And now you have a cute balloon wreath, perfect for an Up! birthday...or any birthday party really.


Check out my sidebar to see where I link up each week!

Monday, March 12, 2012

Disney Up! birthday party


Whew, what a weekend! I have been up to my ears in sprinkles and balloons for the past month, but all the hard work was worth it when I got to see my little girl's smile when she saw her Disney Up!-themed birthday party come to life. I drew a lot of inspiration from across the blogosphere, and I have several tutorials to come later in the week after I recover from all the madness ;)

The Invitation


I used Photoshop and Picnik (while I still can!) to make the party invite. I originally wanted to make an elaborate pop up card design, but it ended up being a simple design with a bunch of balloons. Sometimes simpler is better :)

The Decor

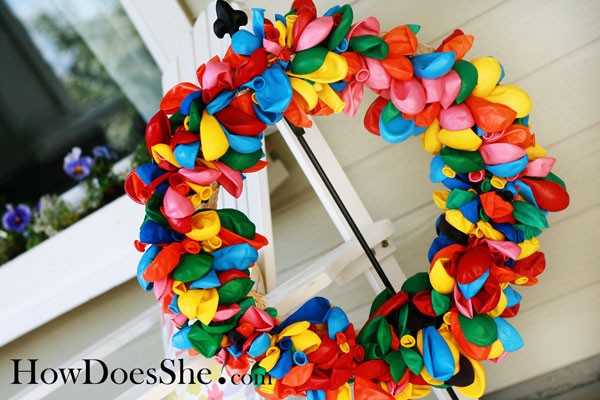
I made my own spin on the balloon wreath for our door (tutorial to come!) to set the theme as soon as people walked up to the house. It was an easy project (love those) and I really love how bright and colorful it was.

And of course, there were balloons everywhere. We bought a small helium tank and blew up as many as we could (about 30) and used them to decorate the house and food table.

The Food


For the table, I made a simple pom pom garland to drape across a blue table cloth, and taped bunches of balloons to the back of the table. Then, I got to have fun making lots of colorful snacks.


1. Skewers of fruit with "cloud dip" - marshmallow fluff and cream cheese whipped together
2. Little cups of cut up carrots and celery with ranch dressing in the bottom
3. Marshmallow pops dipped in chocolate and covered in sprinkles
4. Paper cones made out of scrapbook paper and filled with popcorn
5. (Not pictured) pigs in a blanket
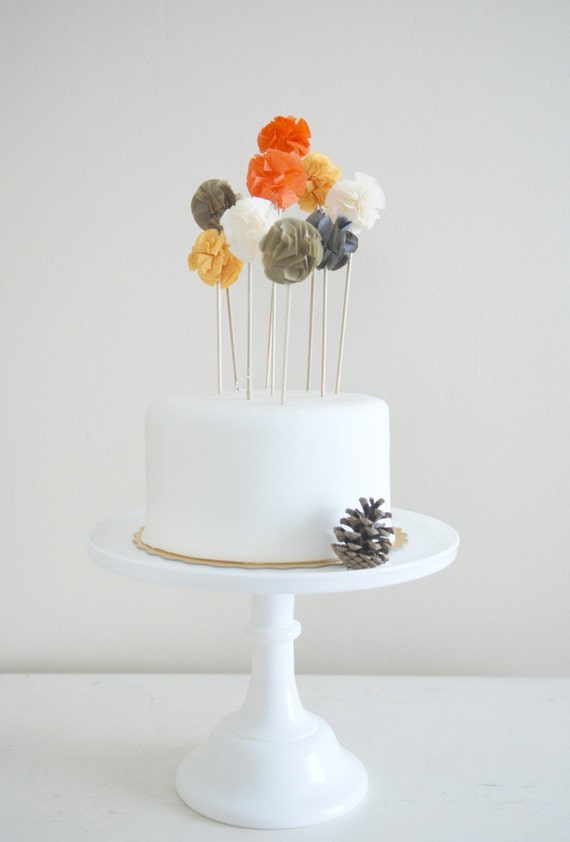
The Cake


Then, there was the star of the show - the cake! Haley has been asking for strawberry cake this whole time, so I went the simple route and made a Duncan Hines cake mix and frosted it with a cream cheese frosting that I got from my Better Homes and Gardens cookbook. It was delicious!

For the cute cake toppers, I found this idea from Potter and Butler. I used felt and made the poufs, then I hot glued them to skewers to make really adorable cake poms (and check out Potter and Butler's shop, they sell all sorts of fun cake toppers!)

The Giveaways


On the giveaway table, I made a sign with the Up! house design on it asking people to take some goodies home with them. Balloon clusters were taped to this table as well.


For the kids, I made "Ellie Badges," the cute little grape soda bottle cap pins that Ellie and Carl wore in the movie. I designed the labels myself and adhered them to bottle caps that I saved (tutorial soon.) There are several shops on Etsy that sell similar pins, but I knew I could make them myself (and I had a lot of fun doing it too.)

I also designed Wilderness Explorer Badges like Russell wore in the movie. I handed these out for the kids to color and cut out at home. I wanted to also make felt sashes for each of the kids to be able to glue the badges to, but I ran out of time. I'll be sharing these printable badges with you soon too :)


For the adults, I made simple sandwich cookies by purchasing store-bought sugar cookie dough and mixing sprinkles into the dough to make colorful cookies. I then made more cream cheese frosting and sandwiched it between two cookies. Each guest received 2 cookies in each cellophane bag tied with ribbon. Luckily, we had some leftovers :)
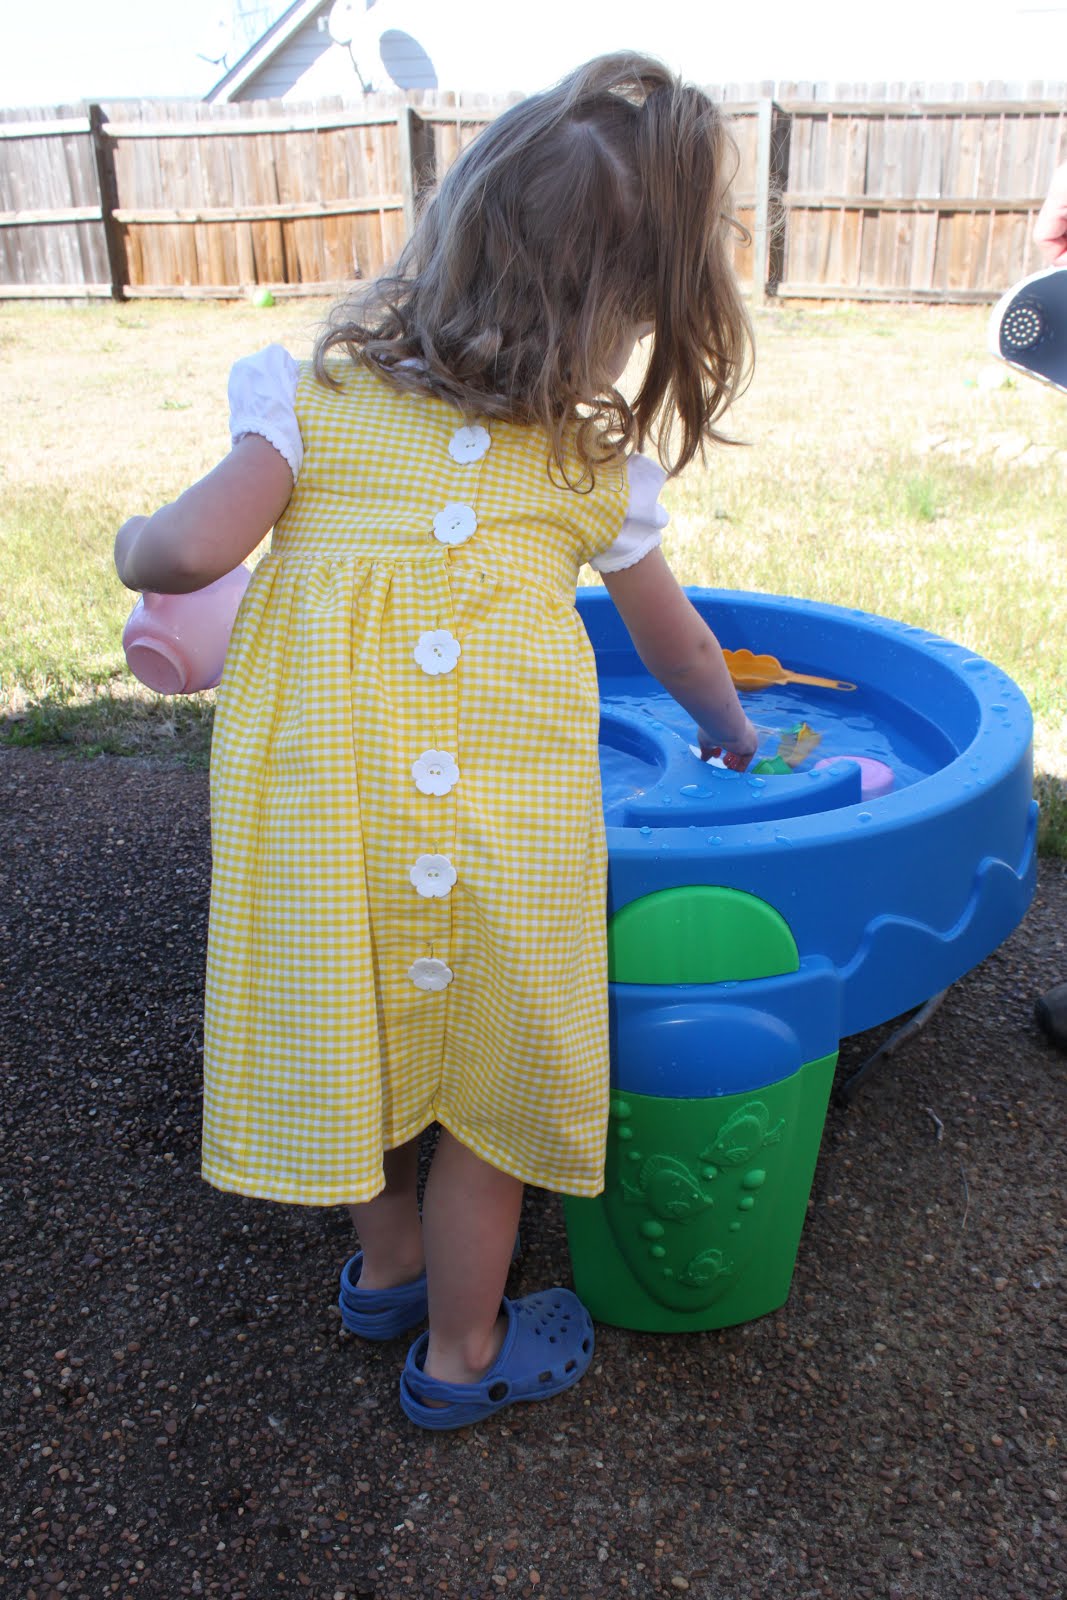
The Dress


For the birthday girl, I wanted to make her a dress to wear that would look like something Ellie wore in Up! I bought some yellow gingham and flower buttons and followed this tutorial for The School Girl Jumper by Simple Simon and Company. It turned out really cute! And of course, she wore the Ellie Badge that I made her to complete the look.


I sewed cute flower buttons down the back of the dress to complete it. I also had cute little shoes to wear with the dress, but Haley loves her Crocs and it was her special day, so I wasn't about to push it :)

---------------------------------

I hope you enjoyed all the party details! It was a really fun party to plan, especially since I had so much creative reign since there aren't any commercial Up! party supplies out there. 

I'll be sharing the DIY projects that I made throughout the week in case you're planning an Up! party too.

Check out my sidebar to see where I link up each week!

Friday, March 9, 2012

Birthday party eve


Haley finally got to ride that merry-go-round that's she's been asking about since her trip to the hospital last week. This is actually her second time in the past 3 days, it's her favorite thing to do and we can't deny the girl anything since she got out of the hospital. We're lucky she hasn't realized how much she can get away with yet.

My husband's parents are in town visiting for her birthday party tomorrow, so she's being even more spoiled by them. She deserves it, she's been such a brave girl this past week, even after going back to the doctor's office for a checkup to make sure all is well. And I'm happy to report that she is healthy! Music to my ears :)

So now, we're all geared up and ready to go for this little 3-year-old's birthday party tomorrow! And if you guessed that we're doing an "Up!" themed party, you're right! Our house is currently filled with bags of balloons and lots of rainbow colored everything. I have quite a few projects to share with you after the party is over, I went a little overboard with the DIY's for the party. Up! was just a fun theme to plan around, I couldn't help myself.

I hope everyone has a fantastic weekend!

Thursday, March 8, 2012

It's party central over here

So, there's this little girl who is turning 3. THREE. I know that I've had a whole year to see this coming, but it still hit me out of nowhere. And she has been talking about her birthday for weeks now.  Haley gets really excited when other people have birthdays because she gets cake out of the deal (I get excited for the same reason), so when we told her that her third birthday is coming up, she hasn't stopped talking about cake. Specifically, strawberry cake. She still speaks in sentences with gibberish thrown in, so I mostly hear something like this:
"Haley's happy birthday, and dsjdagjkl strawberry cake and fjlkh dfkjakdjg present skj open and butterfly inside! Yay!"
I don't know when she decided that she absolutely HAD to have strawberry cake, but that's the one thing I knew had to be included in her party. The present with a butterfly inside? Not sure if I can swing that. I have no luck with pets in general, so putting one in a box as a present to my 3-year-old is probably out of the question.

I'm pretty excited about the theme actually. When I plan birthdays for the kids, I usually have to sit there and think really hard about what to make to go along with the theme. Haley started out wanting a Rapunzel party, but suddenly a couple months ago she had a change of heart.

And Instead of telling you exactly what theme I'm planning, I'm going to be mean and make you guess the theme based on what I have pinned on Pinterest :)


 So, any guesses? (that last one pretty much gave it away :) Her party is this Saturday, and we're so excited to celebrate!

Tuesday, December 6, 2011

Monster sandwiches


You can find the full details on the Little Monster 1st Birthday HERE


My absolute favorite part of the things I made for my son's Little Monster birthday party was the monster sandwiches.

I originally planned on making 3 different kind of monsters, but after I made this guy, I thought "how can they get any cuter than this?"

Here's what you need to make your own monster sandwiches:
  • Bread
  • Olives 
  • Lunch meat
  • Cheese slices
  • Toothpicks
  • A round cookie cutter or a glass and a knife
First, take a cookie cutter and cut the center out of your bread slices. Don't have a round cookie cutter on hand? No problem, do what I did and turn a glass turned upside down and use a knife to cut around the edges.


Next, put your choice of fillings inside (I went with ham and turkey lunch meat) and any other condiments you think your guests would like.


To make the teeth, simply cut jagged edges around half of a  slice of cheese and insert the cheese inside the sandwich on the bottom.


Make the eyes by snapping a toothpick in half, and inserting each half into an olive. Stick the olives in the top of your sandwich.


Ta-dah! Monster sandwich!


How fun would it be to make your child a whole monster-themed lunch for school one day?

If you had the time (and the endurance to cut out multiple monster cheese teeth), you could always make a whole pack of monster sandwiches for a crowd.


Check out my sidebar to see where I link up each week!

Sunday, December 4, 2011

Little Monster 1st Birthday: the outfit


You can see the full post on Connor's Little Monster 1st Birthday HERE.

I wanted to share some more details about Connor's Little Monster 1st Birthday party. The first thing I did when planning his party was to make him a birthday outfit. Since the party is centered around monsters, I wanted his outfit to feature a monster on it.


I used my Silhouette and sewable interfacing to cut out the "One-Eyed Monster" image from one of my husband's old button down shirts. I removed the eyelashes because I didn't want it to look too girly :) I also cut out the letters for his name from the same material, I then sewed around the edges of everything to attach.


For the pants, I used Dana's Knee Pad Pants tutorial. Unfortunately I used one of Connor's smaller pairs of pants to make the  pattern and I realized AFTER making the pants that I seriously underestimated his chunk. Because of that, I had to make a button closure at the top rather than making the waist a simple elastic waist.


I really like the closure, but Connor still had a hard time wearing the pants because even with the added stretch of the elastic loops, the pants were still too small.


I'm just glad they looked good for the photos. That's what really matters, right? ;)

Thursday, December 1, 2011

Little Monster 1st birthday party

We're back from vacation, I hope you all had a great Thanksgiving! We sure did, and we celebrated our little guy's 1st birthday too. It was a whole week full of parties and overeating. But we didn't mind that at all.

My boy turned one. ONE. I can't believe it's been a year already. He's just growing so fast (maybe a little TOO fast, he's already in 18 month clothing)! To celebrate, we threw him a Little Monster 1st birthday party, customized monster shirt and all. We had a great time!


The invitations were made using my new digital scrapbooking software by My Memories. I actually designed the monster myself using various shapes that were included in the software.


For the food and decorations, I kept it somewhat simple (if you don't count the time I took to design 25 monster sandwiches :) The plates, napkins, banner, table cloth, and pinata were all purchased from Target (I couldn't believe my luck when I went to the party aisle and saw that they had monster party supplies!) We also decorated with some streamers and balloons - again, I wanted easy stuff!


The food was my favorite part. We made "monster fruit dip" by combining a package of cream cheese and a container of marshmallow fluff and dying it green.


And my absolute FAVORITE part was the monster sandwiches (tutorial to come!) in turkey and ham, complete with olive eyes and cheese teeth.


Little monster cake pops with a foam board covered in tissue paper as a stand.


And of course, the cake. I found this cake on Pinterest and was determined to duplicate it. I'm going to man up and confess that I had to Photoshop this picture a bit to cover up the fact that the cake split in the back some after sticking the cake pops into it. It was kind of a bummer that it didn't turn out exactly like I wanted, but I told the perfectionist in me to chill out because it was still pretty dang cute I think. Major props to my mom for piping on all the frosting "fur"!


The cake was 3 layers, with each layer dyed a different color! Note to self: in the future, purchase professional food coloring and not just the little tubes from Wal-Mart. I didn't get the exact colors I wanted, but they were close enough.


Connor couldn't believe his luck at first when we set the cake in front of him. I think he was wondering if we mistakenly gave him his very own huge piece of cake to have all to himself. He got over the shock pretty quickly :)


We didn't do any party games because Connor is so little, but my awesome sister-in-law made these great monster masks out of foam which made for great photo props!


At present time, Connor wasn't too into the actual gift opening.


He was more interested in feeding me the wrapping paper.


But we had a great time catching up with friends and family and celebrating Connor, my favorite little monster boy.


Haley didn't even mind sharing all the attention. Just for a little while. She looked adorable in her monster shirt too.


I'll be sharing more of the details on the party soon!

LinkWithin

Related Posts with Thumbnails