Wednesday, March 30, 2011

Painted Rain Boots

*****Updated on April 18, 2011*****

Polly at Helping Little Hands has been hosting a Read Along on her blog this month to celebrate National Reading Month, and I'm so thrilled to be a part of it!

It wasn't hard for me to choose which book I wanted to use for the read along. My 2-year-old is still learning how to read books and not destroy them, but every once in awhile there's a book she'll actually sit still for.  The Rainy Day by Anna Milbourne and Sarah Gill is one of our all-time favorites!


My favorite thing about The Rainy Day is how it encourages kids to go outside and explore. My daughter loves being outside (she is so much like me!) and that includes being outside on rainy days. What's more fun than jumping in the biggest puddle you can find?


And with all those fun puddles to jump in, you have to have rain boots. So why not make some cute rain boots your child can decorate themselves? And while you're at it, make some for yourself!


Ok, so my daughter didn't actually decorate these, I did. The problem is that she has the attention span of a 2-year-old. Probably because she is a 2-year-old. If your kids are old enough they would have a great time decorating these! Otherwise, just grab some supplies and make whatever design you want!

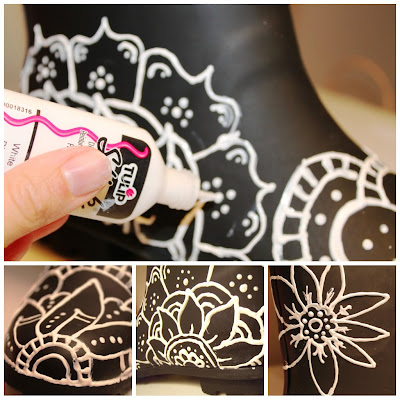
 All you need is some of tubes of fabric paint a pair of rain boots, and some clear, flexible sealant. The greatest part is that you have the freedom to paint whatever pattern or picture you want on your boots and if you don't like what you just drew, just take a paper towel or a Q-tip and wipe if off!


After you're done, cover your boots with a couple of coats of clear sealant, like Mod Podge, and let dry (there may be a better sealant out there - any suggestions??). This project can be as short or as long as you want it to be. It took me under an hour or so to decorate my daughter's boots with lady bugs. And obviously, you don't want to heat set the paint or it'll melt your boots! Just let the paint dry in the open for as long as the bottle states then cover with your sealant. Let the Mod Podge dry for as long as the bottle states, then add a second coat. I found the uncoated kind, like the black ones below, work best for this project.


When you're finished, just find the nearest puddle and....


 I made myself a pair too. These took MUCH longer (probably around 5 hours or so spread out across a few days) because I chose to doodle a bunch of intricate flowers on them and let them dry in between. Then (because I'm a self-proclaimed perfectionist) I had to copy the pattern on the other boot to make them look symmetrical. But if you're not anal like me, you can always just doodle all over your boots to your heart's desire.


Now go outside and explore with your child on a rainy day!


It's hard to find plain, affordable boots out there! These are the rubber boots I purchased for myself on Walmart.com. I did a search for some plain rubber kids boots and found these, which look like they'd be perfect.  
When applying the paint, paint it on pretty thick to lessen the chance of your drawn lines breaking during the natural bending of the rubber as you walk. I painted some of my lines on too thin and they broke so I had to repaint them. 
 
**I've had some problems with the paint peeling on my boots because of the natural bending of the boots as I walk. The Mod Podge helps contain most of the paint, however I'm wondering if there is a better sealant out there, one that's more flexible? There's a tutorial HERE at Morning by Morning Productions where she sprayed a spray adhesive to her boots before painting, which would probably be more effective, then coated it with a clear sealant.

Thanks again to Polly at Helping Little Hands for hosting the Read Along. You can visit her blog to see all of the books and corresponding projects that people chose to celebrate National Reading Month.


I'm linking up here:

Monday, March 28, 2011

Child's Shirt to Dress Refashion


We've been spoiled by unusually warm days in Tennessee recently. Of course, they're mixed in with days that are in the 40's and low 50's. Such a tease. As much as I would like to think the warm weather is here to stay, I'm going to stay realistic and plan for warmer weather in May.

With cooler days still ahead, I wanted to share an easy way to make warm clothes for your child. So head to your nearest sale rack and join me for a quick refashion!

Supplies:

  • A shirt several sizes larger than your child (My daughter is in 2T and the shirt I used for this tutorial is a 5T)
  • A men's white undershirt
  • Sewing machine and thread
  • Disappearing ink marker
  • Seam ripper
  • Straight pins
  • Long-sleeved shirt in your child's size to use as a guide
Here is the shirt I started with:


I got this shirt in the girl's section of Wal-Mart for $3.00. It's a great shirt, but not so ideal for cold weather. If your shirt has sleeves like mine, first use your seam ripper to take the sleeves off. If not, skip right to the next step. You can also leave your existing sleeves on and sew on long sleeves under it if you prefer.

Step 1: Create your sleeves. Next, take the shirt you're using as a template, and lay the sleeve down on top of the men's undershirt on one of the sides, matching the opening of the waistband like this:


By placing the sleeve on the side of the shirt, and with the opening on the waistband, you have less to hem. Lazy? Yes, but so much easier! Use the disappearing ink marker to trace around the sleeve, making sure to add 1/2 inch more to account for seam allowance. Trace the other sleeve on the opposite side of the men's shirt, making sure to line that sleeve up on the side as well. Cut out both of the sleeves and set aside.

Step 2: Cut off extra width. Turn your shirt inside out and lay your template shirt on top. Measure how many inches you'll need to take off of your purchased shirt, and mark with your disappearing ink pen. Using a zig-zag stitch, stitch down both sides of your shirt from the armpit down. Make sure you leave an extra 1/4-1/2 inch on either side for seam allowance. After sewing, cut off the extra fabric. Your shirt should now be the right size in width as well as in the arm holes.


Step 3: Reduce neckhole size. You may need to reduce the neckhole size as well. If so, turn your shirt inside out and mark a straight line from the sholder to where you want your new neckline to be. Then after making sure the binding on your neckline is lined up, sew straight across starting at the shoulder and ending at the neck opening. Cut off the extra fabric.

Step 4: Create sleeves. Take one of your sleeves that you've cut from your men's shirt, and with the wrong sides together, stitch them together to form a tube, making sure both ends are left unsewn. You shouldn't need to hem them at all if you placed the opening of the hand on the bottom seam of the men's shirt.

Step 5: Sew sleeves to shirt. Turn your shirt inside out. Using straight pins, pin the raw edge of the sleeves (which should be inside out) to the raw edge of the armholes. Use a zig-zag stitch to sew around the sleeves and attach them to the shirt. I actually did this the hard way. Ideally, I should have put the sleeve inside of the shirt and then pinned and sewed it.


Turn your shirt and sleeves inside out, and there you have it, instant dress! When the weather gets warmer, you could always chop off some of the sleeve length to make the dress short-sleeved and add some leggings or capris to complete the outfit.


Now add some tights and let your little one outside to play...or eat some grass like mine decided to do.


I'm linking up here:

Friday, March 25, 2011

Living off the land

I'm not doing a very good job of convincing my neighbors I'm not crazy.

Does anyone else have a bunch of wild onions growing in their yard? My yard is absolutely covered in them. And I think it's awesome. Apparently, most people don't share my enthusiasm.


I actually discovered these when I was out on a walk with some of my co-workers. One of the girls dug a couple of them out of the ground to show me. And I tried them. Because that's the obvious thing to do when you find random wild vegetables growing along the side of a busy road.

I guess I thought it was pretty cool that there was actually an edible plant available outside of the grocery store. I know, I'm easily amused. After my discovery, I went home and realized that these things are growing like crazy in my front yard. In every one's front yard actually. Maybe it's a Southern thing? I don't remember any of these growing in my yard when I lived in Virginia.


See all the tall, green tufts? Yup, those are wild onions. And the purple tufts are weeds (we mowed recently, I promise! Thank goodness we're not part of a homeowner's association...) I immediately looked up "wild onions" on Google, and apparently these bad boys are a big problem in Tennessee. Most people consider them to be a nuisance because of how much they grow and how hard they are to get rid of. Me, I look at them and think "garnish".

Recently, I took my daughter outside to play for awhile while I gathered some of the onions. I gave her a box of sidewalk chalk to play with and then I set out on a mission. I attacked the ground with my shovel, removing one small bulb at a time. I was Bear Grylls. I was living off the land, providing for my family, assuring our well-being. I was becoming one with Mother Nature, one wild onion at a time. And then I heard the voice of my neighbor who I had just met a few weeks ago.


Although we've lived in our current neighborhood for 2 years now, we know only 2 sets of neighbors. Well, 3 if you count the little boy across the street who comes over periodically to ask for food. We know our next-door-neighbor because he complains when our leaves fall in his yard and when we left a pile of sticks too close to his house. Apparently sticks attract spiders? News to me, but his wife is deathly afraid of spiders, and our pile of unassuming sticks were an infestation waiting to happen.

The other neighbors (the ones witnessing me digging in my front yard) we know are a couple houses down. We met them a few weeks ago when we were off work because of a snow storm. After talking to he and his wife twice, we were pretty psyched to have met 2 really nice, seemingly normal people outside of work who were our age and who had kids too. As fate would have had it though, they pulled up in their car just in time to see me on my hands and knees, feverishly hacking away at the lawn. It also didn't help my case when my daughter came barrelling at me, her entire face covered in every color of sidewalk chalk.

After my attempts to convince the neighbors that I actually am, in fact, a perfectly lucid human being, I gathered my bushel of wild onions and took my chalk-covered child inside. Then came the fun stuff. And by fun, I mean incredibly time consuming. I washed and cut each of the little stalks of wild onion that I found. It was a labor of love...and it took me over an hour.


Most of the stalks had tiny onion bulbs, but I did have a few that were the size of my pinky. Now, what to do with 1/2 cup of wild onion bulbs? I risked my sanity to retrieve them from the front yard, but now I have no clue what to do with all of them. After doing a little research, apparently Native Americans ate these all the time with eggs. But I feel like I could fancy them up some.

So I ask you, what in the world can I make with wild onions? I'm sure there has to be others of you out there who have tried wild onions before. Maybe you make some fancy quiche with them? A roast perhaps? I need to know. My sanity depends on it.

Wednesday, March 23, 2011

And the winner is.....

Happy Wednesday everyone! Not only is the weekend that much closer, but I have a winner to announce!

As you know, Isabel of Monellisa is giving one of my readers a pack of her beautiful postcards to help me celebrate the 2nd birthday of my blog.


After assigning each follower and comment a number, then using Random.org to select a winner, the winner is.........Alexis!  


Alexis, make sure you visit Isabel's Etsy shop here to choose which pack of handmade postcards you want. I'll be in touch with you soon to get your shipping information.  

Thanks to everyone who participated!

Monday, March 21, 2011

Spring is in the air!

I LOVE spring! I'm so happy that the cold weather is finally going away, I hate being cooped up inside. The weather in Tennessee has been awesome lately. I love being able to walk outside without feeling like my skin is going to burn off. And that's always a big plus.


Along with the amazing weather, I've also seen a lot of awesome spring-themed projects popping up around the blogosphere. 
 

I love this Spring Canvas over at Less Cake More Frosting. I really like the combination of the painted letters along with the fabric flowers. Plus, I'm a big fan of polka dots so this project is a combination of everything good in my book.


These moss covered initials from The Idea Room are a great way to bring the outside in. They would look beautiful in the kitchen, hanging in a window, or maybe hanging in an office to remind you of the gorgeous weather outside! (Actually, maybe that's a bad idea :)


Moss covered centerpieces like these ones from The Crafty Nest are a great way to brighten up a kitchen table.


I love all the colors in this Birdie Sling Bag by Delilah's Momma. It makes me want to go shopping! (At an outdoor mall, of course)


Homemaker on a Dime made awesome ruffled headboard for only $29.19! I've been wanting to make a headboard for my bedroom ever since my husband and I upgraded to a king bed. This might have to go on my (long) list of to-do's. If I can convince him that ruffles are manly that is :)


I've been going through a wreath obsession lately, and this spring wreath from A Soft Place to Land is GORGEOUS. It's so easy to make! All you need is yarn, a foam wreath form, and some paper flowers, and you have instant spring cuteness for your front door. 


If I featured you, don't forget to grab a button!


Also, you have until Wednesday morning, March 23rd to enter my giveaway here and win a pack of beautiful handmade cards from Monellisa. Each person has the opportunity for 2 entries. Go check it out and enter!

Wednesday, March 16, 2011

My first ever giveaway!

**This giveaway is now closed**

I don't know why I didn't mention this earlier, but My Own Road celebrated its second birthday last month!

I started this blog as an outlet to talk about my family, life experiences and the projects that I do. And along the way I've had a lot of fun experiences. There was the time I told my sister-in-law I couldn't read, the day when my daughter hid a crayon in the laundry, when I attempted to work out with a toddler, and most disgustingly, when I accidentally put one of my daughter's boogers in my mouth and learned a very important lesson.

I've also shared a lot of my projects (which you can find in my tutorials.)


Most of all though, I've been lucky enough to have met a bunch of new bloggy friends that seem to think my life is interesting enough to read about too :) So thanks for all of your support, new friends and old! 

So as a belated birthday gift to you, I decided that It's about time I hosted a giveaway for all of you awesome blog readers out there. I've been wanting to give something away for awhile, but I couldn't decide on exactly what. Then I discovered Isabel.


Isabel of Monellisa is a talented artist who likes to work in acrylics, oil, and watercolor. She's even made a bunch of hand painted ceramics. But I'm especially in love with the beautiful watercolor trees she paints.


But enough of my rambling, I'll let Isabel tell you a little bit more about herself.

My name is Isabel Monell. I'm 25, and I love creating unique pieces of art. I know that my talent was a gift given to me so I could create wonderful art to share with others. I'm an artist, and I hold a Bachelor Degree in Studio Art from Old Dominion University. I love painting. I have several years of experience with painting pottery, as well as working with acrylic, oil, and watercolor creations. Because I love creating, I'm always exploring different mediums and seeing where it leads me.


To see more of her work, you visit Isabel  here on her website or go to her Etsy shop, Monellisa, to purchase the paintings, prints, and cards she has for sale.

So here's the deal. To help me celebrate my second blogaversary, Isabel is giving away a pack of her gorgeous postcards to one of my readers!


The winner will get their choice of a 10-pack of postcards in one of 5 designs (or you can choose the "Pretty Little Ladies" collection, which includes 2 of each card.)

Want to win? I thought so.


There are 2 ways to enter: 
  1. Become a follower of My Own Road (that means clicking on the "follow" button in the left hand sidebar. I can't see you if you're hiding in RSS feedland, sorry!) If you're already a follower, you've been entered. 1 entry.
  2. Visit Isabel's Etsy shop, Monellisa, and look around, then come back and leave me a comment on this entry with which cards you would choose if you won. 1 entry.
That's 2 possible entries per person!

This contest is open to US residents only please! Winners will be chosen using random.org and announced on Wednesday March 23rd.

Please make sure I have a way of getting in touch with you. Either leave your email address in your comment, or make sure your profile is set up to include your email. Winners will have a week to respond, otherwise a new winner will be chosen.

Thanks for entering! Oh, and while you're here, why not grab a button?


Monday, March 14, 2011

Grab a button!

I have new blog buttons up!

I finally figured out how to make cool blog buttons! I know, you all probably know how to do this in your sleep. You can find the new buttons in my tabs below my header, or to make things nice and convenient I also posted them below. Just copy and paste the code wherever you want the button on your blog.

Grab this first button if you're a fan of my blog (I would love to hang out in your sidebar :)


This second button is for those of you whose projects I've featured (and I would love to feature you!) If you ever make any projects from the tutorials I post, just email me at myownroad@yahoo.com. Or, if you have a cool tutorial you are interested in posting, email me about those too! If I think they're appropriate for my audience, we just might have to set up a blog date.

Thanks for reading, and don't forget about my upcoming giveaway this Wednesday!

LinkWithin

Related Posts with Thumbnails