Oh yeah, it can.
On a completely unrelated note, are you loving the baby mohawk? People think we shave his head that way, but it just grows that way somehow. I tell people he was just born cool. It's a burden he'll just have to learn to bear as he gets older :)
Using the flocked heat transfer material, which Silhouette so sweetly included in my prize bundle, I ironed on some wording then used my Silhouette to cut out and iron on some fabric for a sandcastle applique.
Here's how you can make one too!
Supplies:
- White flocked heat transfer material
- Fabric for the sandcastle
- Small scrap of fabric for the flag
- Iron
- Silhouette or X-Acto knife and cutting mat
- Sewing machine and thread
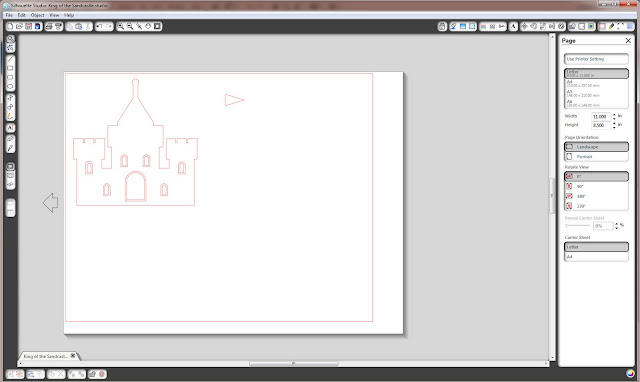
- You can download the King of the Sandcastle Silhouette Studio template found HERE
You can download the Silhouette Studio file for the King of the Sandcastle Shirt HERE. If you don't have a Silhouette, no worries! Just google "sandcastle" and you can find plenty of images to print and trace onto fabric to make your sandcastle and wording.
If you want to make everything from scratch, use Silhouette Studio to create your wording. I typed "king of the sandcastle" roughly 5 1/2 inches wide and 2 1/4 inches tall. Next, I inverted the wording so when I ironed it on my shirt it would read correctly.
I positioned a square of my flocked heat transfer material on the sticky cutting mat and sent it through the Silhouette using the pink blade to cut it.
When I peeled away the negative space, this is what my wording looked like. Use tweezers to remove the little pieces inside the lettering.
Step 2: Make your sandcastle
To make the sandcastle, I used the "Echo Park Sandcastle" design from the Silhouette store and sized it to fit my shirt (approximately 4 inches tall by 4 inches wide). I wanted to cut the flag out of a different color of fabric, so I ungrouped everything by right clicking on the castle and choosing "ungroup," then I moved the flag away from the rest of the sandcastle so I could cut it out of different fabric.

Next, iron on some sewable interfacing to the back of the fabric you want to use for your sandcastle. Make sure the interfacing is an inch or so larger than you want your final image to be. For example, my sandcastle was 4"x4", so I Ironed on a 5"x5" piece of interfacing to the back of my fabric. Repeat with the fabric you're using for your flag. Cut out and remove the paper backing.
Step 3: Cut out your sandcastle and flag.
Follow the instructions for cutting out fabric on your Silhouette. Place your fabrics on the sticky carrier sheet with the right sides facing up and the interfacing down on the carrier sheet. Make sure you pay attention to the positioning of your fabrics relative to your design in Silhouette Studio. You want to make sure your fabric is lined up where your design is located in Studio so the Silhouette will cut your fabric in the correct places. I like to double cut my fabric to make sure I have clean edges.
Send your carrier sheet through the Silhouette for cutting.
Remove the negative space around your sandcastle. Use tweezers to remove those little pieces of fabric in the windows.
Step 4: Iron on your images.
Position your sandcastle and flag where you would like them on your shirt.
Follow the instructions on your interfacing to iron on your sandcastle and flag. Mine said to place a damp cloth on top of my image and iron.
Once ironed on, stitch around the perimeter of your sandcastle and flag. Usually, applique is sewed on with a zig-zag stitch, but I chose to use a straight stitch because I wanted the edges to fray a little to give it some personality.
For your wording, position your words with the shiny side up (the letters should be right reading now) on top of your shirt and using a hot iron on the "cotton" setting, place a washcloth on top of your image and iron for the amount of time indicated on the your interfacing instructions. Silhouette flocked transfer material suggests 45-60 seconds.
Tah-dah!
Every man needs to be king of some kind of castle, right?
Check out my sidebar to see where I link up each week!


Cute (both the kid and the shirt) If you have a minute, I love for you to link up at my party. http://trophyw.blogspot.com/2011/08/will-craft-forfun-linky-party-2.html
ReplyDeleteAdorable! LOVE the saying!
ReplyDeleteThat's so cute!! I need to get a silhouette...bad!
ReplyDeleteThat is so cute! I am still learning how to use my Silhouette...thanks for sharing. I am visitng from Somday Crafts blog hop! Hope you can stop by.
ReplyDeleteHow lovely!
ReplyDeleteI'd love for you to link this to our first ever Blog Hop. "Crafts for Under Twenty-Somethings" is a party specifically for things kid and teen related, so your post would be perfect!
Melanie
bearrabbitbear.blogspot.com
I'm also your newest follower!!
Alright, that's it! I am BEGGING my husband for a silhouette for my birthday!!
ReplyDeleteI am one of your newest followers by the way!
Regina
24-7-365mom.com
This turned out so cute! I love it! We just got back from the beach so I'm still in beach mode!
ReplyDeleteReally great. I order the interfacing for fabric 2 days ago and am so excited to try it. Thank you for sharing
ReplyDeleteGreat tutorial. Now if I can just get my hands on a Silhouette! :D
ReplyDeleteWarmly, Michelle
love it! This is REALLY cute. Makes me want a silhouette!
ReplyDeleteSo adorable and the shirt is cute too :)
ReplyDeleteOh what a cutie pie little man! And I love the gorgeous shirt too of course :)
ReplyDeleteI absolutely LOVE this!!
ReplyDeleteThank yoou for sharing!
Are you on YouTube?
Blessings,
KimberlyRae