Today will be the most detailed day because I'm going to cover the steps to bind your dress either with store-bought bias tape, or by making your own. If you want to make your own bias tape like I did, Prudent Baby has a great tutorial for how to make your own from scratch HERE.
Step 1: Add bias tape to the arm holes and keyhole closure.
Now, you need to enclose the raw edges of your dress. To do this, use store-bought double fold bias tape or make your own like I did. If you're making your own, you want to cut 2-inch wide strips on the bias from your button down shirt so that your final bias tape will be 1 inch wide after folding and cutting. Again, go HERE for more detailed instructions for making your own bias tape if you've never done this before.
First, use a tape measure to measure the length of your arm holes. Cut this length of bias tape out and tuck the raw edges of your dress, as well as the edges of your ruffle, into the tape. Pin and sew the entire length of your arm hole. Repeat to finish the other arm hole.
To enclose the raw edge of your keyhole closure, you'll need to measure the keyhole and line it with bias tape. Pin and sew to finish.
*Optional: If you find that your keyhole closure is poking out too much, you can fold both sides of your keyhole closure with the right sides together, pinch the bottom of your keyhole, and sew a straight line 1/2 inch or so from the bottom. This will help your keyhole closure stay flat and give the back of your dress a cute pleat (ignore the button and bias tape on the top of the dress, we're about to get there :).
Step 2: Finish the back of your dress.
To finish the back of your dress you'll need to measure 2 pieces of bias tape, 1 for each side of your keyhole closure. Measure each side and add 1/2 inch to both measurements. Cut your 2 pieces of bias tape.
The sides of your bias tape will need to be sewed closed because they are exposed. You could just sew the ends closed, but that leaves messy ends and I like to make them pretty.
All you have to do is take your bias tape, which has already been folded and ironed, and fold it down the middle against the crease so your flaps are to the outside and the end looks like an "M". Sew a line down the short ends 1/4 inch from the edge and clip the extra fabric, then turn inside out using a pointed object to push your corners out, and voila! Now you have your tape for the right side where you'll be sewing your button.
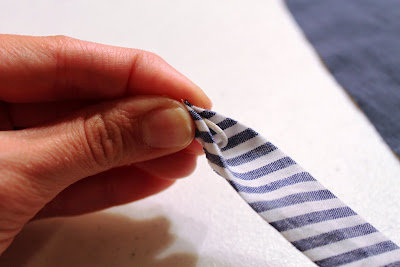
The bias tape lining the left side will need some elastic sewed on one side to keep your dress closed in the back. Using the same method above, fold your fabric against the crease making an "M" and sew one end closed. Before sewing the other end, insert a loop elastic thread 2 inches long (or how ever big you need it to be to accommodate your button) into the crease with the loop facing away from the end of the fabric and the tails sticking out some (see picture below.)
Sew this end closed, clip the extra fabric and any additional elastic thread tails sticking out, and turn inside out.
Now, pin your bias tape with the loop to the left of your keyhole, and the other piece on the right side. Sew to finish.
Hand sew a button opposite of your elastic string to complete your keyhole closure.
Step 3: Finish the front of your dress.
To finish the front, measure the top of your front piece and add 1/2 inch. cut out this length of bias tape. I used the same fabric I used for the ruffles. Since both ends of your bias tape will be exposed on the front as well, use the method above to enclose both edges of your bias tape.
Pin and sew to enclose the top of your dress and armhole.. Your dress should look like the picture to the right so far. Still with me?

__________________________________________________
Whew! Today was pretty detailed, but it's smooth sailing from here.
Smooth sailing, get it? Ok, bad nautical joke ;)
Tomorrow, we make straps. Try to contain yourselves! If you have any questions, feel free to ask!


No comments:
Post a Comment
Thanks for all of your wonderful comments! I try to respond to each of them through email so please make sure you leave an email address or have your profile set up to include your email address if you want me to respond :)