Showing posts with label jewelry. Show all posts

Monday, July 23, 2012

On a jewelry kick

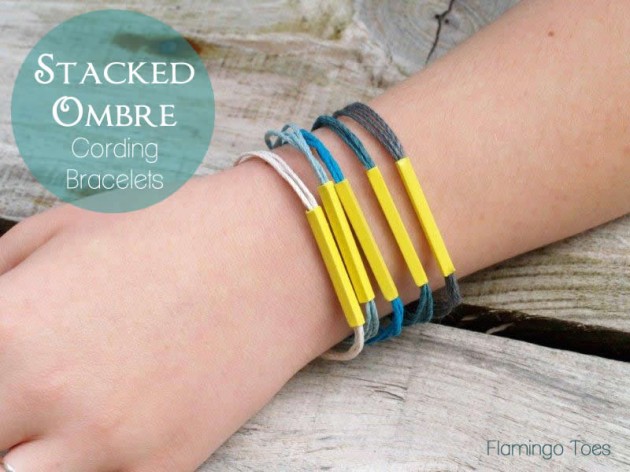
I'm sure you've noticed that I'm on a jewelry kick lately. I seem to go through these crafting phases where I get really hooked on a particular kind of craft and lately, it's been making jewelry. It's been nice to put my sewing machine aside for a little while and explore a different medium. Plus, I can kick my feet back and watch TV while making jewelry. With sewing, you usually have to stay glued to your machine until you're done with the project. Since I've been settling into my new home in PA, I've been looking for cute projects that are quick and I came across Bev's tutorial for Stacked Ombre Cording Bracelets.


Bev's blog, Flamingo Toes, is always my go-to when it comes to jewelry making. She puts together great knockoff tutorials for Anthro jewelry that you'd usually have to pay an arm and a leg for and her tutorials are always really easy to follow. I happened to be at a hardware store a couple of nights ago, so after reading her tutorial, I picked up some brass tube and modified her tutorial to make a couple of bracelets of my own!


I didn't have any cording, but I did have suede so that's what I used for mine. I also opted to be really lazy and cut the tubing with wire cutters rather than doing it the (way cleaner and better-looking) correct way of using a saw or other tool to cut the tube. Please also don't look too closely at the fact that I went with silver clasps because I didn't have gold :) My motto is "make it work" AKA "I'm too lazy to do it the right way so I'll use what I have." I bought more brass tubes to make more, and I'll definitely be cutting it with a saw next time.


Thanks, Bev, for the great tutorial (and the new addiction to making these awesome bracelets)!

Monday, June 25, 2012

Knotted suede bracelets


I don't usually like to wear bracelets. I have skinny little wrists, so I can never seem to find one that fits just right. The bracelet usually ends up dangling loosely from my wrist as I write, and my handwriting already looks like a 3rd grade boy's, so I don't really need something that might make it even worse.

Despite my reservations, I was browsing the craft section recently on a trip to Wally World, and I spotted some suede cording that was just screaming to be made into bracelets. I'm in love with all of the pretty friendship bracelets and layering bracelets I've been seeing everywhere, so I grabbed some cording and beads and came up with these great knotted bracelets that get even ME to love wearing multiple bracelets all the time.


First to determine the length you need, wrap the cording loosely around your wrist. You need a length that is a little over 4 times your wrist size (it may seem big, but you'll be folding the cord in half and making lots of knots so if you're in doubt, make it too long so you have more to work with.) I have skinny little wrists, and my total length was 36 inches.


If you have small beads, you may want to snip the ends of your cording to make it easier to thread your beads on. Next, fold your cord in half and tie an overhand knot at the end to make a loop for the closure. Finally, thread your first bead on and tie a knot a little bit below the bead. Thread another bead on the side opposite where you strung the first bead and tie another knot. Repeat. Tie a knot at the end of the bracelet to finish.


Now you have a pretty knotted bracelet! You can buy all sorts of different colored suede cording and beads. I made a black and tan one, they go with everything :)

 
Layer them or wear one by itself, they're cute either way!


Check out my sidebar to see where I link up each week!

Wednesday, June 13, 2012

Wire wrapped gemstone tutorial


As I mentioned yesterday, we just got back from a relaxing vacation to Asheville, NC. While we were there, we also visited the town of Chimney Rock, which happens to have some of the cutest shops with killer deals, including these amazing new moccasins that I've been trying to wear with every outfit I own. One of my favorite parts was gem mining, where we got a big bucket full of sand and gems that we sifted through to find our treasures. We were total tourists, but it was a blast. Especially when we came back with bags full of these:


Of course, I couldn't just let these pretty gems just sit around, so I thought I'd show you a quick tutorial on how to turn rough (uncut, unpolished) gems into great little charms for necklaces or bracelets. Please keep in mind that I've never done this before and I'm sure there's a much better technique, but it worked for me! Also, this works best with gems that have rough edges to catch the beading wire on.

Supplies:
  • Rough gems
  • 20 gauge (or more) beading wire
  • Round nose pliers
  • Wire cutters
  • Jump ring
  • Jewelry glue (optional)

Start by placing the end of the silver beading wire on the middle of the back of your gem. Begin carefully and slowly wrapping the wire around your gem, making sure to overlap the end of your beading wire. Once you feel like you've secured the gem properly, cut the end of your wire roughly 1 1/2 inches from your gem with wire cutters. Twist your wire up through your last row, and use your round nose pliers to create a loop. Snip extra. Finish by adding a jump ring. If you want to be extra careful, dab a few drops of jewelry glue where the wire meets the gemstone.


You could leave your charm by itself, or add other embellishments like feathers or beads. Have fun turning your treasures into jewelry!

Check out my sidebar to see where I link up each week!

Wednesday, May 2, 2012

Wooden bead necklace

I'm always on the lookout for easy projects that I can do with supplies I have on hand. You know, the kind that you can do in between dinner when you have a toddler attached to your leg and a 3-year-old begging to watch Barbie Mermaid Tale for the 30th time that day? Yup, that was me yesterday.

Recently, I've been finding a lot of really great new blogs that I keep adding to my ever-expanding list. Like I need another blog to read. Sometimes I wish blog stalking was a vocation, but then I think about how if that happened, I would probably live solely off of coffee and NutriGrain bars while my body slowly became one with my computer chair. Probably not the best way to go.

While doing my usual blog reading, I came across this awesome tutorial for a simple beaded necklace from Fine and Feathered that fit my criteria exactly. I love the simplicity of it, so I decided to make one for myself.


Oh, and did I mention that it involves only wooden beads and suede cord? I felt like I was at craft camp. Except for at my house. And macaroni art wasn't involved.


I followed her basic idea for how to make the necklace, but I used different beads and made the necklace in one piece rather than making a separate loop with the beads. What do you think? I'm really loving it. I'm really into the whole southwestern kick right now, and I feel like this necklace will be the perfect accessory for my outfits that fit that theme.

I'm kicking myself for throwing away the giant bag of wooden beads I tossed several years ago. When I was 18, I had this elaborate plan to make a bead curtain in my room (and yes, I realize that we're no longer in the 70's, I don't know what I was thinking.) Now I'm just wishing I had more wooden beads to make several hundred more bead necklaces.

LinkWithin

Related Posts with Thumbnails