Showing posts with label sew-along. Show all posts

Friday, August 19, 2011

Sail Away Dress Sew-Along: Day 5


Today is the last day of the Sail Away Dress Sew-Along! I hope you've had fun sewing with me :) After yesterday's post, your dress should be finished. Today's post is all about making the sash to go with it.

For the sash, you need some fabric from one of your button down shirts - I used one of the sleeves - and a couple lengths of knit fabric, which I cut from an old t-shirt.


Step 1: Make your main piece.

First, measure your child around their waist where the sash will sit (no need to add any extra to the measurement.) Cut a strip of fabric this length by 4 inches wide (and hopefully your fabric won't be as wrinkled as mine because you'll iron yours like I should have :)


Fold your rectangle in half with the right sides together and press.


Sew down the long side to make a tube.


Next, press your seam to the middle. Do this by moving the long side you just sewed so that it's in the center of your tube, then iron down. Turn your tube right side out.


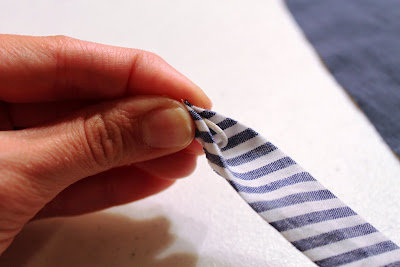
Next, tuck your open ends inside of your tube and press.


Step 2: Attach your ties.

 Cut 2 pieces of knit fabric each approximately 20 inches long and 1 inch wide. I cut my pieces from an old t-shirt. There's no need to hem any of the ends because knits don't fray - love that!


Tuck one end inside of your tube and topstitch 1/4 inch from the edge...


And that's it!


A great little dress for the last warm days of summer. You could even pair it with a long sleeve shirt and some leggings for when the weather gets cooler.


But let's not think about cold weather yet.


Let's savor the warm weather while we have it. Which, for Tennessee, is until about October so I guess my little cutie will be getting a lot of wear out of this dress!


Thanks for sewing along with me! 

If you make a Sail Away Dress I'd love to see it! Please email me at myownroad(at)yahoo(dot)com!

Thursday, August 18, 2011

Sail Away Dress Sew-Along: Day 4


The end is near! And I don't mean in a creepy "end of the world" sort of way. More of a "your dress is almost finished!" kind of a way. After today, all we have left to do is to make the sash, which is totally optional (but oh so cute :)

Now on to strap making!


Step 1: Create your straps.

To make your straps, first measure your child over the shoulder from the point on her chest where you want the top of the dress to hit to her shoulder blade where you want the back of the dress to hit and add 2 inches. Cut out 4 rectangles from your shirt this length and 1 1/2 inches wide.

Place 2 pieces on top of each other right sides together, and fold in half with the folded part at the top, pinched between your thumb and forefinger. Cut at an angle starting from the bottom and meeting the end of the fold. Unfold your pieces, and you should have 2 angled sides, almost like an arrow.


Pin and sew around the perimeter of your straps, leaving the one short end that isn't angled open.


Clip the pointed parts of your strap close to your thread (but make sure you don't cut your thread), and use a pointed object to turn your straps inside out.

Tuck the open end of each strap inside and press closed. Topstitch around the entire perimeter of each strap about 1/4 inch from the edge.

Step 2: Sew button holes on your straps.

Sew button holes 1/4 inch from the pointed ends of each strap. Make sure your button holes are big enough to accommodate your buttons.


Step 3: Attach your straps.

Flip your dress inside out. Line up your straps with the inside edge of your dress. Pin your strap so that the bottom overlaps the bottom of the bias tape slightly. Sew on top of the line you previously sewed when you attached your bias tape.


If you want to make sure the straps are really secure, you can sew a second line above that one like I did. This is what the strap should look like when looking at your dress right side out.


Step 4: Add buttons to the front.

Now, just hand sew a couple of buttons to the front of your dress on each end, and that will do it for the dress itself!


Aside from the sash, your dress is done!
__________________________________________________

Tomorrow, I'll show you how to make the sash to go with your dress.

Thanks for sticking with me, see you tomorrow for the last day of the Sail Away Dress Sew-Along!

Wednesday, August 17, 2011

Sail Away Dress Sew-Along: Day 3


Today will be the most detailed day because I'm going to cover the steps to bind your dress either with store-bought bias tape, or by making your own. If you want to make your own bias tape like I did, Prudent Baby has a great tutorial for how to make your own from scratch HERE.

Step 1: Add bias tape to the arm holes and keyhole closure.

Now, you need to enclose the raw edges of your dress. To do this, use store-bought double fold bias tape or make your own like I did. If you're making your own, you want to cut 2-inch wide strips on the bias from your button down shirt so that your final bias tape will be 1 inch wide after folding and cutting. Again, go HERE for more detailed instructions for making your own bias tape if you've never done this before.

First, use a tape measure to measure the length of your arm holes. Cut this length of bias tape out and tuck the raw edges of your dress, as well as the edges of your ruffle, into the tape. Pin and sew the entire length of your arm hole. Repeat to finish the other arm hole.


To enclose the raw edge of your keyhole closure, you'll need to measure the keyhole and line it with bias tape. Pin and sew to finish.


*Optional: If you find that your keyhole closure is poking out too much, you can fold both sides of your keyhole closure with the right sides together, pinch the bottom of your keyhole, and sew a straight line 1/2 inch or so from the bottom. This will help your keyhole closure stay flat and give the back of your dress a cute pleat (ignore the button and bias tape on the top of the dress, we're about to get there :).


Step 2: Finish the back of your dress. 

To finish the back of your dress you'll need to measure 2 pieces of bias tape, 1 for each side of your keyhole closure. Measure each side and add 1/2 inch to both measurements. Cut your 2 pieces of bias tape.

The sides of your bias tape will need to be sewed closed because they are exposed. You could just sew the ends closed, but that leaves messy ends and I like to make them pretty.

All you have to do is take your bias tape, which has already been folded and ironed, and fold it down the middle against the crease so your flaps are to the outside and the end looks like an "M". Sew a line down the short ends 1/4 inch from the edge and clip the extra fabric, then turn inside out using a pointed object to push your corners out, and voila! Now you have your tape for the right side where you'll be sewing your button.


The bias tape lining the left side will need some elastic sewed on one side to keep your dress closed in the back. Using the same method above, fold your fabric against the crease making an "M" and sew one end closed. Before sewing the other end, insert a loop elastic thread 2 inches long (or how ever big you need it to be to accommodate your button) into the crease with the loop facing away from the end of the fabric and the tails sticking out some (see picture below.)


Sew this end closed, clip the extra fabric and any additional elastic thread tails sticking out, and turn inside out.


Now, pin your bias tape with the loop to the left of your keyhole, and the other piece on the right side. Sew to finish.


Hand sew a button opposite of your elastic string to complete your keyhole closure.


Step 3: Finish the front of your dress.

To finish the front, measure the top of your front piece and add 1/2 inch. cut out this length of bias tape. I used the same fabric I used for the ruffles. Since both ends of your bias tape will be exposed on the front as well, use the method above to enclose both edges of your bias tape.

Pin and sew to enclose the top of your dress and armhole.. Your dress should look like the picture to the right so far. Still with me?


__________________________________________________

Whew! Today was pretty detailed, but it's smooth sailing from here.

Smooth sailing, get it? Ok, bad nautical joke ;)

Tomorrow, we make straps. Try to contain yourselves! If you have any questions, feel free to ask!

Tuesday, August 16, 2011

Sail Away Dress Sew-Along: Day 2

Welcome back to day 2 of the Sail Away Dress Sew-Along!

If you missed day 1 where I show you how to make your pattern and the ruffles, go HERE.


Yesterday we covered the beginning basics of making your dress. Now, we'll dig a little deeper into the details.

Step 1: Cut your keyhole closure.

Now to make the keyhole for your button closure on the back of your dress.


First, measure the top of your back piece to find the center and draw a line 3 inches long with a disappearing ink marker.


Next, measure 1/2 inch on either side of this line, and draw 2 lines 1/2 inch shorter than the first.


Cut out your keyhole following the lines you drew, making sure the top and bottom of the keyhole are  curved as you cut.


Step 2: Sew your front and back pieces together.

Place your front piece on top of your back piece with the right sides together. Pin from the arm holes to the bottom of the dress. Sew from the bottom of the arm holes down (don't sew the arm holes closed!) with a straight stitch and finish the edges by serging or zig-zagging the edges.


Turn your dress inside out and press. It should look like this so far:


_________________________________________________

Thanks for coming back for day 2. Tomorrow will be pretty detailed. We'll be covering bias tape and how to make your own (or, if you want to make things REALLY easy, you could always buy a couple of packages of double fold bias tape from the store.) 

See you back here tomorrow!

Monday, August 15, 2011

Sail Away Dress Sew-Along: Day 1


Welcome to the first day of the Sail Away Dress Sew-Along, which is just a long title to say "here's some steps to make a cute dress using 2 old button down shirts and some scraps." 

But doesn't "The Sail Away Dress" sound much better?


 The sew-along will be going on all week, and I'll cover steps from making your pattern to binding your dress. I use 2 men's button down shirts to make my dress, but you can substitute cotton fabric or knit fabric if you like.


Let's get started!


 Supplies

  • 2 men's button down shirts to cut up
  • 3 buttons
  • 2 inches of elastic thread
  • Scraps of knit fabric for the sash
  • Sewing machine and basic sewing supplies
Step 1: Make your pattern.

Using a dress that fits your child well, lay the dress on top of the front of your men's shirt that you want to use for your main fabric, making sure it's centered over the button placket and that the bottom of your dress is 1/2 inch from the bottom of your men's shirt (this is so you can keep the original bottom hem - less sewing you have to do!)


Trace 1/2 inch around the dress for seam allowance - add more if you want it looser for longer wear. Also make sure any sleeves are tucked in so you can trace the armholes properly.


Cut out. This is your front piece.


To make your back piece, trace the piece you just cut out on the back of your men's shirt, but add an additional inch to the top since the back is higher than the front. Cut out.


That's it for your main pattern pieces, seriously.


Step 2: Make your ruffles.

Measure the length of the top of your front piece and multiply times 2. Cut 2 rectangles from your other men's shirt with this length and 3 inches wide.


Fold and press one of  the long edges on each rectangle 1/4 inch under, then fold and press another 1/4 inch. Sew your folded edges down with a straight stitch.

For the other long edge, set your machine's stitch length and width to the highest numbers possible, and sew a basting stitch straight across 1/4 inch from the edge, making sure not to backstitch at the beginning or the end. Keep the tails of your string long when you cut them.

Gently tug on one of your thread tails and push the fabric with your other hand to create your ruffle. Keep scrunching your fabric until the ruffle is the same length as the top of your front piece. Tie knots in each end to secure your ruffles. Cut the extra thread.


Step 3: Attach your ruffles.

Line up the raw edge of one ruffle with the raw edge of your dress's front piece (make sure your ruffle is right side facing up.) Set your stitch width and length back to normal. Pin and sew your first ruffle down.


Next, flip your top ruffle up and measure 1 1/2 inches down from that (if a button is in the way just pin it above or below the button a little), pin your second ruffle, and sew straight across.


Both of your ruffles should now be attached to the front of your dress like so, and the raw edge of your second ruffle should be hidden under the first.


__________________________________________________

That does it for day 1 of the sew-along! 

Tomorrow we'll cover how to make your keyhole closure and sewing your main pieces together.

Please let me know if you have any questions: myownroad(at)yahoo(dot)com

Check out my sidebar to see where I link up each week!

LinkWithin

Related Posts with Thumbnails