Showing posts with label Tutorial. Show all posts

Tuesday, August 21, 2012

Eat. Sleep. MAKE: Estate Saling Series

 I've started a new blog at eatsleepmake.com and will no longer be updating this blog (more details here). I will be posting updates here for a short while until everyone has a chance to switch over to follow the new blog, Eat. Sleep. MAKE.

--------------------------------------------------

Have you ever shopped at estate sales before? They're a great place to find some valuable stuff, IF you know what you're doing that is! This week, Shannon is sharing some great tips on how to plan, prepare for, and find the best stuff at estate sales in her 3-part series.


 Make sure you check out Eat. Sleep. MAKE. tomorrow for the last part of the series that will cover what stuff to buy at estate sales!

Come follow Eat. Sleep. MAKE via Google Friend Connect, RSS feed or email. You can also stay informed on the latest news at Eat. Sleep. MAKE via Pinterest, Facebook, or Twitter.

Thursday, August 16, 2012

Eat. Sleep. MAKE tutorial: Citrus and Herb Soap

I've started a new blog at eatsleepmake.com and will no longer be updating this blog (more details here). I will be posting updates here for a short while until everyone has a chance to switch over to follow the new blog, Eat. Sleep. MAKE.

--------------------------------------------

I know, I know, more soap :) I just can't help myself, it's so easy to make! Today's tutorial on the new blog is on how to use fresh citrus peels and herbs to make great summer-y scented soaps - come check it out and make sure to follow me at Eat. Sleep. MAKE. if you haven't already!


Come check out the tutorial and follow Eat. Sleep. MAKE via Google Friend Connect, RSS feed or email. You can also stay informed on the latest news at Eat. Sleep. MAKE via Pinterest, Facebook, or Twitter.

Wednesday, June 13, 2012

Wire wrapped gemstone tutorial


As I mentioned yesterday, we just got back from a relaxing vacation to Asheville, NC. While we were there, we also visited the town of Chimney Rock, which happens to have some of the cutest shops with killer deals, including these amazing new moccasins that I've been trying to wear with every outfit I own. One of my favorite parts was gem mining, where we got a big bucket full of sand and gems that we sifted through to find our treasures. We were total tourists, but it was a blast. Especially when we came back with bags full of these:


Of course, I couldn't just let these pretty gems just sit around, so I thought I'd show you a quick tutorial on how to turn rough (uncut, unpolished) gems into great little charms for necklaces or bracelets. Please keep in mind that I've never done this before and I'm sure there's a much better technique, but it worked for me! Also, this works best with gems that have rough edges to catch the beading wire on.

Supplies:
  • Rough gems
  • 20 gauge (or more) beading wire
  • Round nose pliers
  • Wire cutters
  • Jump ring
  • Jewelry glue (optional)

Start by placing the end of the silver beading wire on the middle of the back of your gem. Begin carefully and slowly wrapping the wire around your gem, making sure to overlap the end of your beading wire. Once you feel like you've secured the gem properly, cut the end of your wire roughly 1 1/2 inches from your gem with wire cutters. Twist your wire up through your last row, and use your round nose pliers to create a loop. Snip extra. Finish by adding a jump ring. If you want to be extra careful, dab a few drops of jewelry glue where the wire meets the gemstone.


You could leave your charm by itself, or add other embellishments like feathers or beads. Have fun turning your treasures into jewelry!

Check out my sidebar to see where I link up each week!

Wednesday, May 9, 2012

Fabric bolts from cereal boxes

My name is Jen and I have a problem. This is my fabric stash.


Ok, well it's part of my fabric stash. It's a giant mess. Pieces of fabric are everywhere, and I hope you're not expecting me to have everything in alphabetical order by designer, color, and pattern because that's pretty much never happening.

I feel like a crafting failure sometimes when I see pictures of peoples' gorgeous sewing rooms. Everything is in its proper, labeled place, and heaven forbid there be anything in the room that doesn't match the color scheme. There's no mess, no half-finished projects laying on the ground. And definitely no toys scattered on the floor.

I'm convinced these people don't have children. They borrow neighbor kids for photo shoots.

There's a reason I didn't show you the rest of my sewing space. I share it with a bin of toys that belong to my kids, and the bin stays organized for about 5.4 seconds before it looks like a hurricane hit the room. I love having the toys in the room because I can still craft and play with the kids simultaneously, but my pieces of fabric everywhere doesn't help the mess.

But I wanted to do what I can to organize the room because, let's admit it, I can't pin the blame for that messy fabric pile above on my kids. I saw this tip on The Little Green Bean for using foam board to make mini fabric bolts. It's a great idea, but I wanted to use something I had on hand.  Then it came to me - cereal boxes! Cereal is something I eat a LOT of, so why not re-purpose the boxes rather than throwing them away?


First, cut your cereal boxes so you have a pile of just the front and backs of your boxes.


Next, use hot glue around the perimeter of one of the front sides of your panels.


Place the other panel on top of it and voila, instant mini bolt! It may not look like anything special, but just wrap your fabric around that baby, and your stash will stay organized!


Ahhh, much better.


So much better than the messy pile right? Too bad I have 4 times more fabric in the drawers below. I have a lot of cereal to eat.

Note: Since cereal boxes are small, you may need to fold your fabric in half length-wise (possibly more than once) to be able to fit them around your cereal box bolt. 

Check out my sidebar to see where I link up each week!

Monday, April 23, 2012

No-sew framed fabric honeycomb


In my continuous (and extremely slow) effort to re-do my craft room, I wanted to make another picture to keep my Bee Inspired print company :) This is a really quick, no-sew project that is perfect for getting rid of those pesky scraps you may have sitting around. It's also really great for showcasing some of your favorite fabrics that you can't bring yourself to make into a piece of clothing that your child will grow out of in 2 days.

If you're not into the whole honeycomb thing, try different shapes! Triangles? Circles? Heck, go crazy with some octagons. Whatever floats your boat.

Supplies:
  • A bunch of scrap fabric
  • Interfacing, like Heat N Bond
  • Burlap
  • Picture frame
  • Iron


Step 1: Iron on your interfacing.

First, decide how big you want your hexagons to be. This will determine how much of your fabric you'll need. My picture frame size was 11x13 1/2, so I decided on 4 rows of hexagons for a total of 16 hexagons that were 2 1/2 inches tall and 3 inches wide. I cut 6 each from 2 different colors and 4 from another. The white fabric was used to accent, and I cut 6 smaller hexagons that were 1 3/4"x2" each.


Follow the instructions on the back of your interfacing to iron some interfacing to the back of your fabrics.


Step 2: Cut your hexagons out.

You should now have several strips of fabric with interfacing on the back of them.


To get your hexagon shape, Google or find some clipart of a hexagon and use Word to size it to whatever size you need. Cut out and trace the hexagon to the paper backing of your interfacing. Cut out your shapes, and remove the paper backing.


Step 3: Attach your shapes on the burlap.

Cut out a piece of burlap big enough for your frame. Be sure to cut it a tiny bit larger than needed, I cut mine a little too small so you can see the frame a little on the bottom.


Arrange your hexagons on the burlap until you're happy with the placement.


With a hot iron, carefully iron on your large hexagons first by lifting and placing the iron on a couple hexagons at a time (no dragging the iron across). After your large hexagons have been ironed on, layer your smaller accent hexagons on top and iron those on in the same way.


Now, just insert your finished piece in your frame and hang!

Enjoy your art!


Check out my sidebar to see where I link up each week!

Thursday, April 19, 2012

The Caroline Dress


I'm a sucker for little girls' dresses, not that my daughter needs anymore dresses. I'm pretty sure my 3-year-old has more clothes then me, and DEFINITELY more dresses than me. When I was her age, I only wore dresses when my mother forced me into them on Sundays. These days, I'm only too happy to make my daughter wear them as much as possible until she realizes how comfortable jeans and t-shirts are over frilly girly dresses. And before she catches Bieber fever.

Sigh.

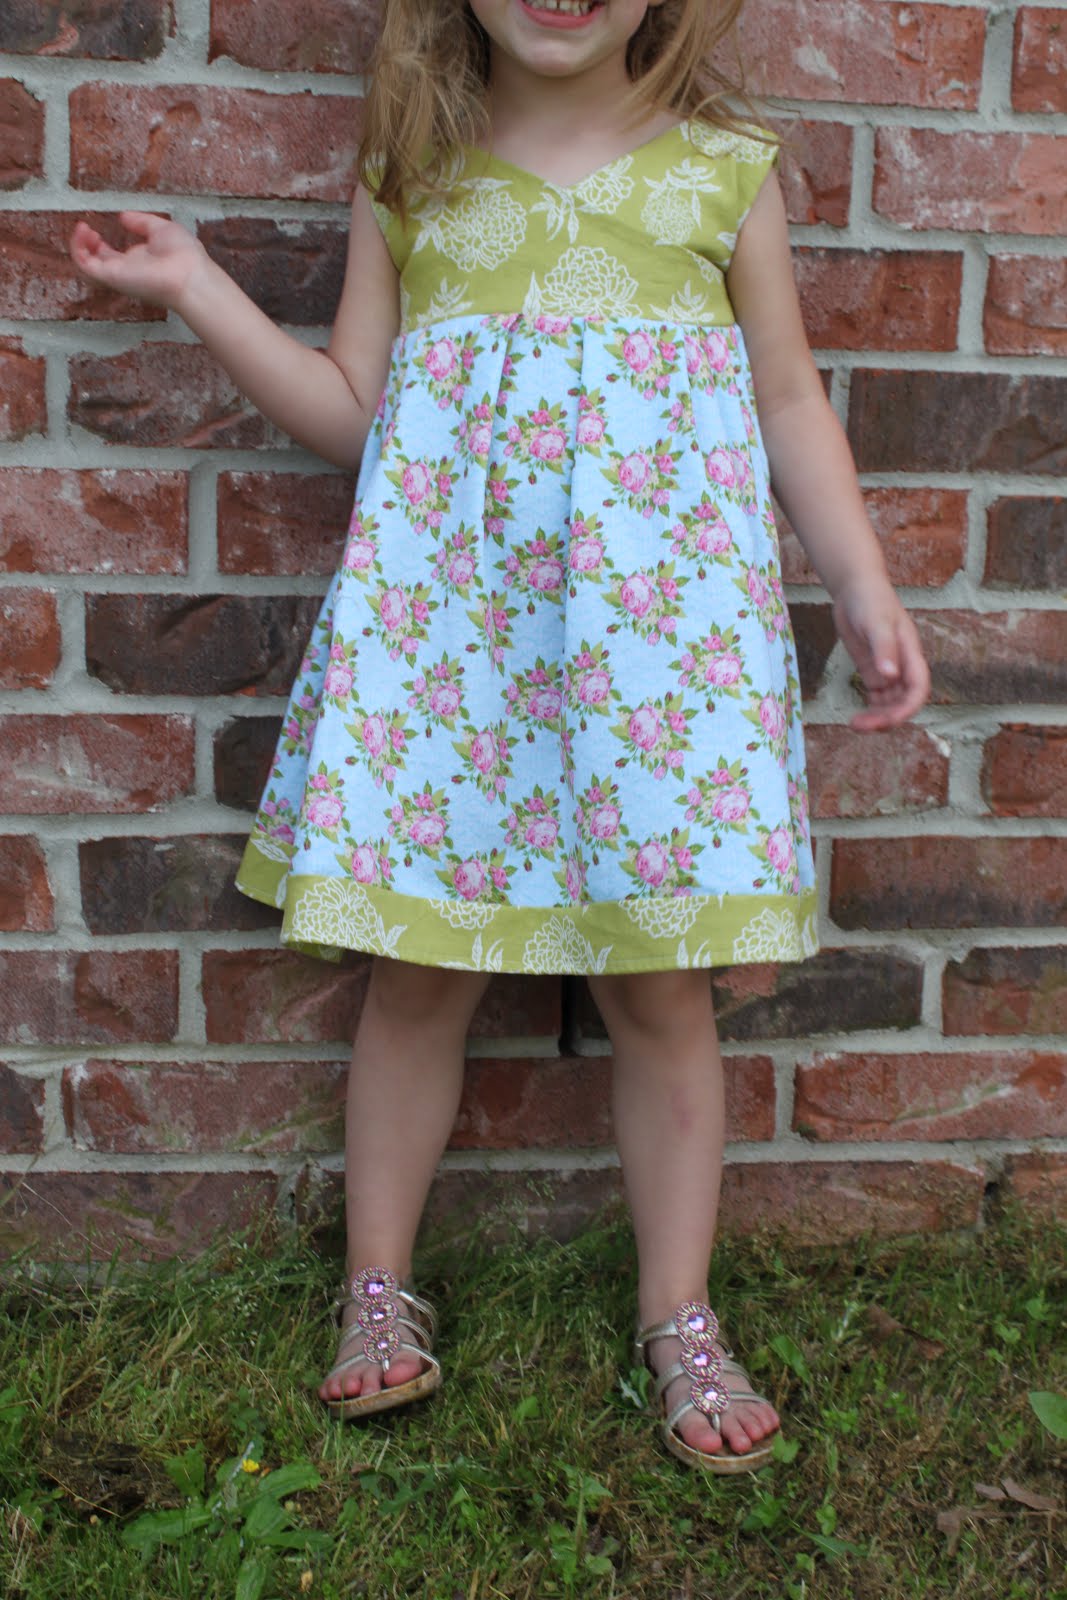
I actually made this dress for Haley for Easter and mentioned it in this post, but I'm excited to share it with you! I've been dying to try my hand at making a dress with a crossover front, and I'm happy to say this dress turned out pretty darn awesome. In fact, I couldn't get Haley to take the dress of after church. That is what we call a win.


Supplies (based on 3t/4t size):

  • 1 yard cotton fabric
  • 1/2 yard coordinating fabric 
  • Paper to make your pattern
  • Shirt that fits your child well to make the pattern
  • 3 buttons
  • Disappearing ink marker
  • Sewing machine and sewing supplies
Step 1: Draft and cut out your pattern pieces.

First, you'll need to make your pattern. I made my pieces by first laying out a shirt that fits my daughter and drawing around it to make two bodices.


Next, I drew a line from the neckline to the armpit to make the crossover bodice. For the back piece, I just cut my pattern piece down the middle.


Step 2: Join your pieces.

Now to cut out your pattern pieces. You need 2 of each piece, a front and a back for each since the bodice has a lining. You can do this easily by folding your fabric with the right sides together and cutting out your pattern pieces, giving you 2 of each. You'll end up with 4 front bodice pieces (a front and a lining for each) and 4 back pieces (a front and a lining for each.) When you cut out your 4 back pieces, make sure to add 1 inch to the center of each for the button placket. Make sense?


Place your pieces with the right sides together and sew along the lines indicated below. You'll be leaving your shoulders and bottom of each unsewn.


Turn your pieces right side out and iron.To make the next steps easier, I numbered each of the pieces. The two front bodice pieces are 1 and 2, and the back pieces are 3 and 4.


First fold the raw edge of the open shoulder of 1 inside itself and iron so that the raw edge is enclosed inside. Insert the shoulder piece of 3 inside 1 as shown below, and pin and sew straight across to finish. Repeat with pieces 2 and 4.


Here's how your finished bodice should look after the shoulders have been joined. Match up the side pieces of your front bodice. Your back pieces should overlap an inch to account for the button placket.


(Not shown) at this point, you should fold your bodice onto your back piece with the right sides together and match up the sides. Sew so that sides of the front and back of your bodice are now joined.
 

Step 3: Make your bottom panel.

Determine how long your bottom panel will need to be and subtract 2 inches. Now, measure the length of your bodice and multiply by 2. Cut two pieces of fabric this length and width from your for the bottom of your dress. Also cut 2 strips of fabric this same length and 3 inches wide for the accent fabric at the bottom.


Attach your fabric strips to the bottom of your panels by placing the pieces right sides together and pinning. Sew to attach and serge or zig zag the raw edges where the panel and accent fabric were joined. After the accent fabric has been added, hem the bottom of your piece to hide the raw edge. Repeat with your other fabric strip and panel.


Now you'll need to gather your fabric. Sew a basting stitch (the longest length and width on your machine) straight across the top of your panel. Gather the fabric until your panel is the same width of your bodice. Repeat with the other panel, and then place the two pieces right sides together and sew up the sides so you have a tube. You could also make pleats instead (which is what I ended up going back and doing when I made the dress a little too big!)


Step 4: Attach your bodice to the bottom of your dress.

You should have 2 main pieces now, your bodice and the bottom of your dress. To attach the two, first make sure your bodice is right side out and the bottom of your dress is inside out. Also make sure that the back pieces are folded over correctly (left side should be overlapping right) and pin in place.

Insert your bodice into your gathered tube and match up the raw edges. Pin all the way around and sew. Finish your edges by serging or zig-zagging.


Now just make your button holes and sew on your buttons!


Now you have a new pretty spring dress (or an Easter dress in my case :)


This is actually the first dress I made for Haley that she's refused to take off. That does a mama's heart good.


Check out my sidebar to see where I link up each week!

Tuesday, April 3, 2012

Shirred top to dress {clothing refashion}


I have this shirt that I can't bring myself to part with. I've had it for about 5+ years now, and I've always hung onto it because I love the embroidery detailing on it, and more importantly, I had my engagement pictures taken in it.

Aw, look at young, blonde me!


Unfortunately in this case, I am a skinny girl and that carries over to my *ahem* bust area. The shirring on the top of the shirt is pretty, but I can't manage to keep it up very well :) I didn't want to throw the shirt away though, it just looked too pretty and carried too many memories, so I refashioned it into a dress for Haley. It's cool to think I wore the shirt over 5 years ago when my daughter was just a dream, and now she's running around playing in it. What a great way to repurpose a piece of cherished clothing!


Supplies:
  • Shirred top
  • Disappearing ink marker
  • Double fold bias tape
  • Scissors
  • Sewing machine and basic sewing supplies

Step 1: Size your shirt. 

Here's the shirt I started with. I put it on my daughter to figure out how much I needed to take off the sides.


I simply turned the top inside out and pinned down both sides. Then, I used my disappearing ink marker to mark the areas that I would be trimming off. Using a zig-zag stitch, I sewed along the sides of my dress on the lines I drew and cut off the excess fabric.


Step 2: Make your straps.

Next, measure your child over the shoulders to determine how long your straps would be and add 1/2 inch. For my 3-year-old, my straps were each BLANK.

Position your bias tape on the inside of your dress and stitch down using 2 separate rows of stitches. Repeat to attach the straps to the back of your dress. I decided to cross the straps so they would make an 'X' in the back.


To add more visual interest to the dress, I made an inverted box pleat


And that's how an old, loved shirt became a new dress for my daughter :)


Check out my sidebar to see where I link up each week!

LinkWithin

Related Posts with Thumbnails