Showing posts with label Silhouette. Show all posts

Sunday, December 11, 2011

My Christmas mantel


FINALLY I can share my Christmas mantel with you! (And can we all just vow to overlook my dirty fireplace tile that I didn't vacuum before the pictures? K great.)

Christmas is fast approaching and since we'll be out of town this year, we decided not to get a Christmas tree. That and also Connor would probably try to eat the needles so I'd like to avoid my son poop a Douglas Fir if possible.

Since there was no tree, I decided to go all out with my mantel and decorate it using things I already had, as well as store bought items to keep it affordable but festive (several tutorials to follow over the next few days!)


Most of my supplies were purchased at Wal-Mart, like these snowflake and and icicle ornaments, ribbon, and garland below.


I used a vase that I already had and some fake berries I found at the Dollar Store to add a pop of color to the cool palette that I chose. I made these awesome hurricane vases myself and filled them with small ornaments.


This printable nativity is another super easy tutorial that I'll be sharing soon.


And these garland trees were also handmade, including the tree forms (another tutorial as well.)


But my favorite part had to be my "Let it Snow" wall art that I made using an old frame that I repurposed. I originally had something else in mind when I started making it, but it morphed into this  instead (which I actually like better than my original plan.)


I hope you like my mantel! Not too shabby for my first shot I think :) Check back over the next few days for tutorials on how to make a lot of the decorations you see!

Check out my sidebar to see where I link up each week!

Monday, October 10, 2011

Babushka Doll Shirt {a Silhouette Project}

I just love the ladies over at Prudent Baby. They're so sweet every time I talk to them, not to mention all of the great projects they have for mama's and kiddos. They had a contest awhile ago to see who could come up with the cleverest phrase to go along with a Silhouette Babushka Doll cutouts they were giving away. My entry was "Sometimes it's ok to be full of yourself." I thought it was pretty clever. I didn't make first place, but they were sweet enough to humor me and send me a cutout of the doll anyway. Awesome!

I have several babushka dolls that I've collected through the years, and they now sit in Haley's bedroom up on a high shelf along with all the other things she's not allowed to touch. She always asks for them, so I knew she'd love it if I made her a shirt using the babushka doll cutout.


Supplies:
  • Shirt
  • Babushka Doll design in Silhouette Studio
  • Iron on transfer material
  • Sewable interfacing
  • Scrap fabric the same size as your doll cutout
  • Scrap felt for the flower
  • One small button
  • Basic sewing supplies

Step 1: Cut out your 2 doll pieces.

You will need 2 babushka doll cutouts: 1 of the full design on transfer, and the second just a silhouette of your doll in fabric.

First, use your Silhouette to cut your babushka doll design. Weed the excess transfer material, saving the outline of your doll (seen below).


Next, follow the instructions on the sewable interfacing to iron interfacing to the back of your scrap fabric. Using the outline you saved from your babushka doll template, trace your outline on your fabric using a disappearing ink marker.  Cut out.


Iron your babushka doll fabric onto your shirt and sew around the perimeter of the doll.


Step 2: Apply your iron on transfer material.

Now that your design has been weeded, place the design on top of your fabric. Follow Silhouette's instructions to iron the transfer material to your shirt.


I use a little Fabric Fusion to stick down any unruly edges that don't want to be ironed down well.


Step 3: Make your flower embellishment.

Cut two circles out of your felt: one that is 1 inch in diameter, and one that is about 3/4 inches in diameter.


Place your biggest circle on the bottom, then stack the smaller circle on top followed by the button. Hand sew your flower to your shirt.


Not too bad, right? (Besides the fact that you can see the blue disappearing ink marker I used to trace the doll :)

Haley was just happy that I let her play with the dolls during the photo shoot.


Check out my sidebar to see where I link up each week!

Wednesday, August 10, 2011

King of the Sandcastle Shirt {a Silhouette project}

After making a shirt for Haley using my Silhouette, I got brave and decided to give the Silhouette a challenge. I chose a more detailed image for an applique to see if it could cut out tiny details on fabric.


Oh yeah, it can.


On a completely unrelated note, are you loving the baby mohawk? People think we shave his head that way, but it just grows that way somehow. I tell people he was just born cool. It's a burden he'll just have to learn to bear as he gets older :)

Using the flocked heat transfer material, which Silhouette so sweetly included in my prize bundle, I ironed on some wording then used my Silhouette to cut out and iron on some fabric for a sandcastle applique.

Here's how you can make one too!

Supplies:
  • White flocked heat transfer material
  • Fabric for the sandcastle
  • Small scrap of fabric for the flag
  • Iron
  • Silhouette or X-Acto knife and cutting mat
  • Sewing machine and thread
  • You can download the King of the Sandcastle Silhouette Studio template found HERE
Step 1: Create your wording.

You can download the Silhouette Studio file for the King of the Sandcastle Shirt HERE. If you don't have a Silhouette, no worries! Just google "sandcastle" and you can find plenty of images to print and trace onto fabric to make your sandcastle and wording.

If you want to make everything from scratch, use Silhouette Studio to create your wording. I typed "king of the sandcastle" roughly 5 1/2 inches wide and 2 1/4 inches tall. Next, I inverted the wording so when I ironed it on my shirt it would read correctly.


I positioned a square of my flocked heat transfer material on the sticky cutting mat and sent it through the Silhouette using the pink blade to cut it.


When I peeled away the negative space, this is what my wording looked like. Use tweezers to remove the little pieces inside the lettering.


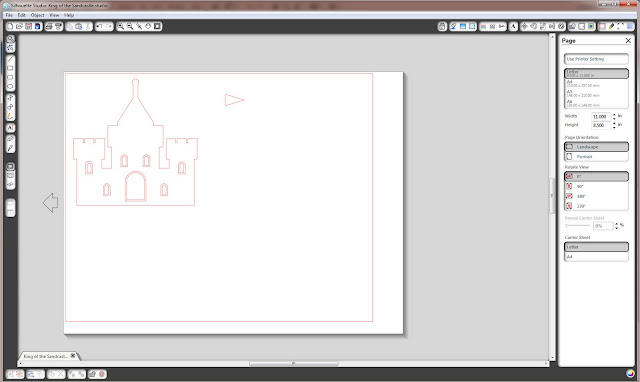
Step 2: Make your sandcastle

To make the sandcastle, I used the "Echo Park Sandcastle" design from the Silhouette store and sized it to fit my shirt (approximately 4 inches tall by 4 inches wide). I wanted to cut the flag out of a different color of fabric, so I ungrouped everything by right clicking on the castle and choosing "ungroup," then I moved the flag away from the rest of the sandcastle so I could cut it out of different fabric.


Next, iron on some sewable interfacing to the back of the fabric you want to use for your sandcastle. Make sure the interfacing is an inch or so larger than you want your final image to be. For example, my sandcastle was 4"x4", so I Ironed on a 5"x5" piece of interfacing to the back of my fabric. Repeat with the fabric you're using for your flag. Cut out and remove the paper backing.


Step 3: Cut out your sandcastle and flag.

Follow the instructions for cutting out fabric on your Silhouette. Place your fabrics on the sticky carrier sheet with the right sides facing up and the interfacing down on the carrier sheet. Make sure you pay attention to the positioning of your fabrics relative to your design in Silhouette Studio. You want to make sure your fabric is lined up where your design is located in Studio so the Silhouette will cut your fabric in the correct places. I like to double cut my fabric to make sure I have clean edges.


Send your carrier sheet through the Silhouette for cutting.


Remove the negative space around your sandcastle. Use tweezers to remove those little pieces of fabric in the windows.


Step 4: Iron on your images.

Position your sandcastle and flag where you would like them on your shirt.


Follow the instructions on your interfacing to iron on your sandcastle and flag. Mine said to place a damp cloth on top of my image and iron.

Once ironed on, stitch around the perimeter of your sandcastle and flag. Usually, applique is sewed on with a zig-zag stitch, but I chose to use a straight stitch because I wanted the edges to fray a little to give it some personality.


For your wording, position your words with the shiny side up (the letters should be right reading now) on top of your shirt and using a hot iron on the "cotton" setting, place a washcloth on top of your image and iron for the amount of time indicated on the your interfacing instructions. Silhouette flocked transfer material suggests 45-60 seconds.


Tah-dah!

Every man needs to be king of some kind of castle, right?


It's a great little summer shirt, even if you don't have a beach (*sigh*)


Check out my sidebar to see where I link up each week!

Wednesday, July 27, 2011

I Love Shoes Shirt {a Silhouette project}

My daughter is obsessed with shoes. I'm pretty sure she has more than I do, and for a 2-year-old, that's saying a lot. One of her favorite words is "shopping," and if we make our way to the shoe section, you can be sure she'll find the most glittery, pink pair of shoes she can find.

I think we have a future shoe addict on our hands and with the way she has her daddy tied around her little finger, this could mean major trouble for our budget.

When I won my amazing Silhouette from Grosgrain back in May, I couldn't wait to try it out. This baby has made my life SO much easier, I don't know how I ever lived without it! For my first Silhouette project, I decided it was time to take my daughter's shoe obsession public. I got my inspiration from a friend of mine who bought her daughter an adorable shirt from Target that said "I {heart} shoes" on it with flats embellished with a flower. I decided to do something similar to that.

This shirt is a relatively quick project and requires very little sewing.

Supplies:
  • T-shirt
  • Silhouette smooth iron on transfer material
  • 2 colors of fabric scraps
  • 2 small buttons
  • Needle and thread
  • Sewable interfacing
  • Sewing machine and thread
  • Silhouette
  • Iron

Step 1: Create your image and wording in Silhouette Studio and cut out.

I used Silhouette Studio to create and flip my "i love" wording in BLANK FONT so it's backwards (when you iron it on, it'll read correctly.) Next, I modified the "Shoes with Flowers" design that I purchased from the online Silhouette store by removing the flowers on the shoes and creating a more rounded toe area  since I wanted to create my own embellishment later.


Following Silhouette's instructions, cut out your image and wording, then remove any negative space you don't want ironed on your shirt. Use tweezers to remove those little extra bits that are hard to get.


Step 2: Iron on your image.

Position your image and wording with the shiny side up on top of your shirt.


Follow the heat transfer instructions to attach your image to your shirt.


Step 3: Create your flower embellishments.

To create your flower embellishments, you can either cut out some circles by hand, or let your Silhouette do it for you (which is what I did.) You'll need 2 colors of fabric scraps big enough to cut out 2 1-inch circles from.

Iron some sewable interfacing to the back of your fabrics according to the interfacing instructions and remove the paper backing. If you're using a Silhouette, position your fabric scraps on the sticky carrier mat, interfacing side down, and use your Silhouette Studio to draw and cut out 4 1-inch circles: 2 from each fabric. If you're cutting by hand, trace and cut out 2 1-inch circles from each fabric.


Using pinking shears, cut around the edges of 2 of your circles to make decorative edges.


Step 4: Iron and sew on your embellishments.

I didn't take a picture of this step because it's pretty self-explanatory, but stack one of the circles you trimmed with your pinking shears on top of one of the other circles (as shown above) and place on top of one of your shoe images. Place a towel on top and iron on according to the interfacing instructions. Sew around the perimeter of your circles to secure to the shirt, and hand sew a button on top.


Repeat this process to embellish your second shoe (see below.)


Now Haley can wear her obsession proudly.
And we can be reminded of where all of our money is going.

Check out my sidebar to see where I link up each week!

LinkWithin

Related Posts with Thumbnails