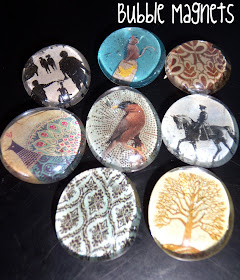
Chances are you've already seen these kind of magnets elsewhere in the blogosphere, but these are so much fun to make (and so easy on the wallet) that I just had to share!
Bubble Magnets are one of my favorite things to give people. Each one is different and they add flair to your fridge. I can't tell you how many of these I have on my refrigerator right now. I've given them as gifts to my friends and family for holidays, and I've even given them as bridesmaids gifts - everyone loves them!
I know there are many sellers on Etsy.com that sell images to use for projects like this, but I prefer to use magazines because 1. you probably already have a pile of magazines sitting around somewhere already and 2. the images are going to be much more unique and diverse.
Supplies:
- Round glass rocks from a craft store (I get a big bag of them for a buck at the Dollar Tree)
- Magazines
- Mod Podge
- Scissors
- Super glue
- Paint brush
Round magnets
Let's get started!
Your goal is to find images that fit within your glass rocks that also look good. Busy patterns are usually distracting, and dark images won't show up well. Take a rock and, as you're thumbing through your magazines, place it on top of different images to see if the image would look good for your magnet.
These are all examples of good images to use:
They are interesting and small enough to fit within the confines of the magnet. The colors are also bright enough to show through the glass, which can sometimes be cloudy.
When you find a good image, cut both the image and a large amount of the background around it out. You can trace around your rock then cut your image out or do what I do (which might be a bit lazy because I don't feel like tracing.) Hold your glass rock on top of the image, making sure it's centered exactly how you want it. Firmly pinch your image and rock between your pointer and thumb, then take your scissors and carefully cut around the rock. Like I said, this is definitely the lazy way of doing it, but it works for me :)
Next, take your Mod Podge and paintbrush and apply a thin layer of the Mod Podge to the front of your image. Press it onto your rock and press out any air bubbles. Your image might look a little "glue-y" (like my picture below) but don't worry, it will dry clear. Apply a thin layer of the Mod Podge to the back of your image to seal. Let dry.
After the Mod Podge has dried, use your super glue to attach one of the round magnets to the back of your glass rock. Let dry.
*A note about glue: use super glue and NOT a glue gun. I used a glue gun at first, and if your bubble magnets ever fall off your fridge (and if you have a 2-year-old like me they will) the magnet will pop right off when they hit the ground. I've had to re-glue most of my magnets that I've used a glue gun on.
Now pimp your fridge with your new magnets!
Linking up:
 |  |  |  |  | |
 |  |  | |||
 |  |  |  |  | |
 |  |  |  |  |
 | Show and Tell Wednesday at Blue Cricket Design |


These are so cute! I won a set from a giveaway and want to make more. My fridge is so boring.
ReplyDeleteLove the fact that you used magazines. I've never thought of giving these as gifts, but that's a great idea :)
ReplyDeletereally cute! how do you get all the buttons to line up so neatly???
ReplyDeleteVey cute! Lovely choice of images too.
ReplyDeleteThanks for this great idea! It looks like you are cutting a paper towel out with the picture. Is that to be glued down after the picture?
ReplyDeleteThank you,
Debbie Johnson
I love these! I have seen them around but have never made my own, now I want to! Thanks!
ReplyDeleteSo neat! I'm definitely going to have to try this. Where do you get your magnets?
ReplyDeleteSO cute! thanks for sharing!!
ReplyDeleteCara
http://miscellaneousme.wordpress.com
I love your magnets - so cute!! I stopped by from The Sundae Scoop, I've posted a project there too!
ReplyDeleteHugs, antonella :-)
http://quilling.blogspot.com/2011/05/wacky-wednesday-hug-card.html
Cute idea! I have some left over marbles from another project so I might need to try this!
ReplyDeleteI want! I want! I cannot wait to make some of these. Sooooo cute!
ReplyDeleteThanks for sharing! I have posted a link of my twitter and facebook pages.
Thank you, I tried this with another glue and it didn't turn out as well. I guess this is the time for my first mod podge project.
ReplyDeleteGoing to try these this week with the boys. Perfect project for us to try for our craft time - will send pics of our magnets.
ReplyDeleteWhere did you find your magnets in bulk like that? I can only find them in 8 or 10 count packages.
ReplyDeleteAlso, I have always applied Mod Podge to the glass stone and put the stone directly on the image I want, and push out the air bubbles, let it dry, THEN cut it out. It is easier to me, than trying to deal with the small cut out and the Mod Podge and the glass stone. Just an idea that some may find easier.
You can get them in a package at the Dollar Store or I've also seen them at Michaels
Deletewow i cant wait to try this !!! thanks for sharing !
ReplyDeleteJust. So. Cute!
ReplyDelete